
| Contents: | Main | Chapter | See Also: | Advanced User Manual | Programmer Manual | |||
With the Inquire to File Entries option, you can select entries from a file, one by one, choose a format for displaying the selected entries, and then output the selected entries.
VA FileMan's print capabilities, on the other hand, allow you to select entries, not one by one, but instead by choosing a range of entries based on the sorting order. You can choose all entries in a file, for example, and sort them in alphabetical order for the printout. Alternatively, you can choose all entries sorting between "E" and "F" and sort them in alphabetical order for the printout.
There are two ways in which you'll have an opportunity to use VA FileMan's print capabilities:
In either case, use of VA FileMan's print features is very similar. In most cases, the only difference is that with the Print File Entries option, you have to choose from which file to print.
Unlike the Inquire to File Entries option, which displays individual records, VA FileMan's print can list all records in a file. Thus, the focus of the Inquire to File Entries option is a single or small group of entries while VA FileMan's prints are concerned with the entire file.
VA FileMan's print features allow considerable flexibility in selecting entries, ordering (or sorting) the entries selected, choosing which fields to display, and formatting the output.
The following two basic components can be used to create a report:
The choices you can make at these two prompts are discussed in detail later in the chapter.
VA FileMan has a standard, columnar format for print output. The file name, current date/time, and page number appear at the top of each report page, followed by column headings that correspond to the labels of selected fields. There are many ways to customize the format, as shown below:
PATIENT LIST NOV 28, 1996 11:32 PAGE 1
 NAME SEX
 ---------------------------------------------------------------------
 ADAMS,JOHN MALE
 BROWN,JOE MALE
 CAPLAN,IRVING MALE
 DOE,JANE FEMALE
This simple example of a report is generated by the dialogue that follows. It prints information from all the entries in the PATIENT file, ordered by NAME (the .01 field in the file). Only data from the NAME and SEX fields are printed, as requested at the "PRINT FIELD:" prompts:
NOTE: You would have received information about every patient in the file, not just these four. You could have asked for several more fields to be printed. They would appear as columns of output, left to right, in the order specified.
Sorting determines the order that records are printed in your reports. You can accept the default order (by the .01 field), or you can specify your own sorting order. The sort can be a simple sort, based on only one field, or you can sort based on the values of several fields.
For example, if you want to print the entries in order from oldest to youngest patient, you could sort the report by date of birth (the DATE OF BIRTH field in the PATIENT file):
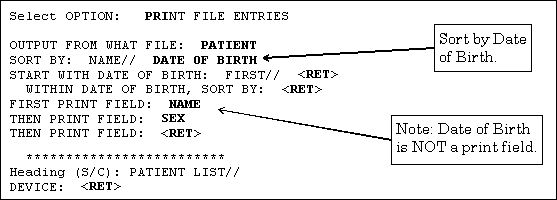
The output then prints in the following order (by DATE OF BIRTH):
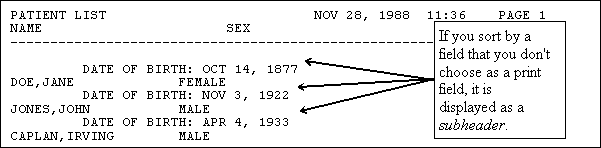
In the previous example, the sort criterion (DATE OF BIRTH) is printed with every change in sort value. VA FileMan does this when a sort field is not specified as a print field.
To suppress the printing of sort values (subheaders) in the body of your report, you can either:
The ordering of entries within a sort is generally from low value to high value. Some special cases:
Sorting Canonic Numbers and Non-Canonic Strings, and the ;TXT Sort Qualifier
Canonic numbers are pure numbers that do not have leading zeros, or trailing zeros after a decimal point. Thus, 1.1 is a canonic number but 01.1 and 1.10 are not. A non-canonic string is everything else. For example, "8C" is a non-canonic string.
This distinction is important when sorting, because in all VA FileMan sorting, canonic numbers sort first, and everything else sorts second. Usually this works very well. But in a few cases where sort fields contain a mix of canonic numbers and non-canonic strings, unexpected sort orders result. Classic cases include sorting on Social Security Numbers and on ward locations.
Consider Social Security Numbers (SSNs). The SSNs 333333333 and 999999900 are canonic numbers. But the SSN 098769000 is not a canonic number, because of its leading zero. When you use the default sort based on Social Security Number, you get output that looks like the following:

A similar situation occurs when you sort on ward locations. Suppose you have wards 8, 8C, and 9. 8 and 9 are canonic numbers, while 8C is a non-canonic string. Thus, if you sort on ward location, your output comes out in this order: 8, 9, 8C.
To avoid this problem, use the sort qualifier ";TXT" on your sort field. This forces all field values to be non-canonic, with the result that a group of strings like 8, 8C, and 9 sort in the expected order.
NOTE: For more information on the ";TXT" sort qualifier, please refer to the list of Sort Qualifiers below.
Besides using sorting to determine the order of entries printed, you can also use the "START WITH ...:" prompt to restrict what entries are printed to a range. For example, if you accept the default sort range (from first to last), you may get a report with every item in the file listed. You can cut this list down to a subset of the entries in the file by how you sort (e.g., entries that sort from JONES,A to SMITH,Z only).
To specify a sort range, enter the range starting point at the "START WITH...:" prompt, and the range end point at the "GO TO...:" prompt. For example:
SORT BY: NAME//
START WITH NAME: FIRST// JONES,A
GO TO NAME: LAST// SMITH,Z
Selecting All Entries with the Same Value for One Field
A simple kind of selecting can be done to choose only those entries that have a particular value for a field. For example, to list only those patients who have a DIAGNOSIS equal to CANCER, you can sort as in the example below:
 START WITH DIAGNOSIS: FIRST// CANCER
GO TO DIAGNOSIS: LAST// CANCER
Other Ways of Selecting Entries
The "START WITH ... GO TO .." dialogue can be used to do sophisticated selecting from a file. Computed expressions can be entered at the prompts to filter the entries to be printed.
NOTE: These powerful techniques are discussed in the "Computed Expressions" chapter of the "VA FileMan Advanced User Manual."
You can also use VA FileMan's search functions to select entries for printing.
NOTE: For more information on the VA FileMan's search functions, please refer to the "Search" chapter in this manual.
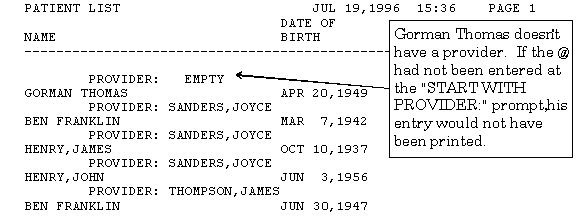
When you sort a report on a particular field, if any record in the file has no value in that field, that record will be skipped and not printed, if you accept the default sort start value (FIRST). In other words, in a print from the PATIENT file, if you sort on the PROVIDER field, start sorting from the default of FIRST, and there are some patients with nothing in their PROVIDER field, those patients will be left off of the report entirely.
If you want to include records in your report, even if they have no value in the field you are sorting on, sort from "@" instead of accepting the default of FIRST. As in the example below, enter an at-sign ("@") at the "START WITH:" prompt:
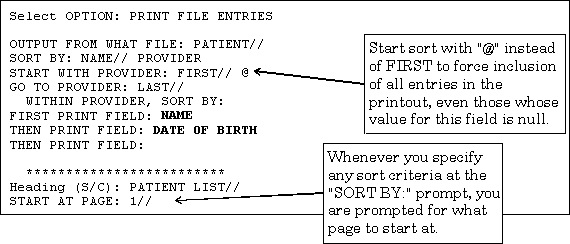
The output of this sort would then include all records, even those with no value in their PROVIDER fields:
As well as entering fields to sort by, you can also enter formatting controls in the "SORT BY:" dialogue. Add these qualifiers to the field label or to the computed expression you're entering at the "SORT BY:" prompt.
Sort Qualifiers to use at "SORT BY:" Prompts
The following table illustrates the sort qualifiers you can use at the "SORT BY:" prompts:
| Qualifier | Action | Discussion |
| !field | Number entries by sort value | Entries having the same value for the SORT BY field are numbered sequentially starting at one. |
| #field | Page break when sort value changes | Starts a new page every time the value of the sorted field changes. |
| 'field | Specify a range for output without sorting | Lets you select
entries based on this field in the "START WITH . . . GO TO . . ."
dialogue, but not sort based on the field.
NOTE: Since sorting requires substantial system resources, do not sort entries unnecessarily. |
| +field | Subtotal within a SORT BY field | When subtotaling, you indicate in
the "PRINT FIELD" dialogue the fields to be enumerated. All requested
numeric operations (sum, count, etc.) will be done as a subtotal when
the SORT BY field changes in addition to the grand totals at the end.
You can sub-subtotal by adding a prefix of + to two fields in the "SORT BY:" dialogue. For example: SORT BY: +REGION This produces subtotals for each STORE within the subtotals for each REGION. |
| -field | Reverse sort order | Only effective for NUMERIC and DATE/TIME valued fields. For DATE/TIME values, prints from most recent to earliest; for NUMERIC values, from largest to smallest. |
| @field | Suppress the printing of subheader | Normally, a subheader with the value of the SORT BY field name is printed for SORT BY fields, if the field is not also specified as a print field. Using an at-sign ("@") suppresses those subheaders. |
| field;Cn | Set column of subheader | The number ("n") indicates the column to begin the subheader. |
| field;Ln | Use less than the entire sort field for sorting | The ;L suffix
lets you specify that only the first "n" characters
of the field be used to sort. Thus, if you specify:
SORT BY: NAME;L2 Only the first two letters of the name field will be used for sorting: the order of "Maris,Roger" and "Mantle,Mickey", for example, will be unpredictable in your output. |
| field;Pa-b | Store sort range for display | The ;P suffix
saves the "START WITH" and "GO TO" sort range for one
level of sort fields, for later reference at a "PRINT FIELD" prompt.
You can substitute any string (up to 60 characters in length) for "a"
and "b" in ";Pa-b". Whatever
strings you use as "a" and "b"
(e.g., FROM and TO) become subscripts of the PARAM() array:
SORT BY: NAME;PFROM-TO Then at a "PRINT FIELD" prompt, you can reference the saved values by using PARAM("a-string") and PARAM("b-string"). Thus, in this case: THEN PRINT FIELD: PARAM("FROM")
The sort-from and sort-to values of "C" and "Dzzzzz" in the report would then print in the appropriate location. The typical reason to save sort values, and then retrieve them from the PARAM array in a print field, is for custom report headers (which are created as PRINT templates). It is one method to print sort criteria in the report header. If you need to sort on two or more fields, you need to use a different string for "a" and "b" at each level, or else the values will overwrite each other. NOTE: No value is saved in the PARAM array if the user accepts "FIRST" or "LAST" as the "START WITH" or "GO TO" sort values; the PARAM array will be null. |
| field;Sn | Skip lines when sort value changes | The ;S suffix
skips one line between sort field values, if no number is added. If you
specify a number ("n"), n-lines
are skipped. You can use this qualifier to skip lines after subtotals
are printed by inserting the following after the last subtotaled field:
WITHIN X, SORT BY: @"";S |
| field;TXT | Sort numbers as text | The ;TXT sort qualifier forces digits to be sorted as alphanumeric strings, not as numbers ("22" sorts before "3"). Use this to correctly sort mixed canonic and non-canonic numbers. |
| field;"xxx" | Replace caption in subheader and sort dialogue | The default subheader is the field
label or expression entered at the "SORT BY:" prompt. The same string
is used within the sort dialogue. You can substitute a string of your
choosing by adding a semicolon (";") and text
enclosed in quotation marks. For example:
SORT BY: DATE OF BIRTH;"Birthdate: " To suppress the caption in the subheader, enter two double quotes after the semicolon: SORT BY: DATE OF BIRTH;"" The specified caption is also used in the subsequent sort dialogue. This is useful in simplifying the sort dialogue when a field label is confusing, is concatenated, or is an extended pointer. For example: SORT BY: STORE:REGION;"Location:" "Location:" is substituted for "STORE:REGION". |
You can save your sort criteria in a SORT template. This lets you reuse the same sorting instructions in future prints from the current file. SORT templates are stored in the SORT TEMPLATE file (#.401). If you sort by more than three fields, you are asked whether you want to store your sort criteria in a SORT template:
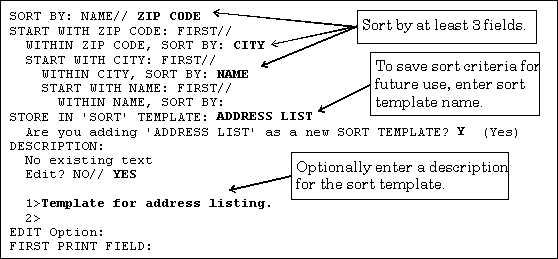
Forcing Creation of a SORT Template
Ordinarily, you are only asked whether to save your sort criteria in a SORT template if you enter three or more fields at the "SORT BY:" prompts. However, to force this question to be asked, enter a right bracket ("]") by itself at one "SORT BY:" prompt. No matter how few fields you sort by, you'll still be prompted to save your sort criteria in a SORT template.
 SORT BY: NAME// ]
SORT BY: NAME//
Reusing Sort Criteria in New Reports
The reason to save sort criteria in a SORT template is so that you can reuse your sort criteria in a new report from the same file.
To reuse a SORT template as the sort criteria in a new report, at the "SORT BY:" prompt in the new report, enter a left bracket ("[") plus the template name:
OUTPUT FROM WHAT FILE: NEW PERSON
 SORT BY: NAME// [ADDRESS LIST
 (Dec 08, 1995@07:53) User #34 File #200
 WANT TO EDIT 'ADDRESS LIST' TEMPLATE? NO//
 FIRST PRINT FIELD:
After you have specified the order in which the output should occur, you are asked to list the fields you want displayed for each file entry. In the simplest case, fields are identified by their label. If you enter a single question mark ("?") at the prompt, a list of all the fields in the file is displayed. If you enter the name of a multiple, you are asked for the subfields you want printed. A subfield must be specified even if the multiple has only one subfield.
To print all fields in the file, enter ALL (uppercase) at the "FIRST PRINT FIELD:" prompt. You are then prompted:
Do you mean ALL the fields in the file? NO//
Enter YES to indicate all fields. Otherwise, the file is searched for field labels beginning with the letters "ALL".
NOTE: Fields from other files can also be printed using extended pointers. This technique is described in the "Using Computed Expressions in COMPUTED Fields" topic in the "Computed Expressions" chapter of the VA FileMan Advanced User Manual. You can also enter other computed expressions, which are also described in that chapter.
VA FileMan's print capabilities provide many ways to format a report. If you don't specify any formatting controls, a format is constructed automatically. The width of each field's print area is computed using information from the field's definition. The default width is the larger of the maximum number of characters allowed for the field and the length of the longest word of the field's label (or other specification) in the print dialogue. Two inter-column spaces are added to separate fields.
However, by using print qualifiers at the "PRINT FIELD:" prompt, for each field, you can indicate how long the field's print area should be, where it should start, how many lines to skip before printing the field, and the column title for the field. You can also insert literal strings within the output.
For fields that have numeric values, you can call for several arithmetic calculations and indicate the number of decimal digits of accuracy. If you have requested subtotals in the sort dialogue (by preceding the field with a "+"), calculations are done at the subtotal level as well.
Print Qualifiers to use at "PRINT FIELD:" Prompts
The following table illustrates the print qualifiers you can use at the "PRINT FIELD:" prompts:
| Qualifier | Action | Discussion |
| !field | Count | The number of entries with non-null values in this field are counted. |
| #field | All statistics | Use with NUMERIC fields only. Six lines of statistical output are generated for the selected field: Total, count, mean, maximum, minimum, and standard deviation. |
| &field | Total | Use for NUMERIC fields only. The values of all occurrences of this field are summed. |
| +field | Total, count and mean | Use for NUMERIC fields only. The sum, count of non-null values, and the arithmetic mean of the non-null values are printed. |
| field;B | Multiples in sorted order | 22.2In previous versions of FileMan, when printing sorted records, any subentries within those records were displayed unsorted, in order by internal entry number. A new B print specifier will ensure that subentries are displayed in order. |
| field;Cn | Set start column position | You can specify the starting column of a field's display. If the number ("n") is a positive number, the field prints in that column counting from the left margin. If it is negative, the field starts in that column as subtracted from the right margin. If there is not enough room on a line for the field to display properly, it is moved to the line below. Adding ;C1 always starts a field's display at the beginning of a line. |
| field;Dn | Round decimal fractions | Specify the number of decimal digits of accuracy with a number, "n". If n=0, the number is rounded to a whole number. The number ("n") must be > 0 or = 0. |
| field;Ln | Left justify and truncate | To left justify within a field width of "n" characters, follow the ;L with the number of column positions you want the field to occupy. If necessary, the data is truncated to fit into this length. Since non-numeric fields are left justified by default, the only effect of ;L on those fields is truncation. This qualifier does not affect DATE/TIME-valued fields. |
| field;N | Suppress consecutive duplicate values | If you do not want the same value for a field printed on consecutive rows of a report, add ;N to the field specification. |
| field;Rn | Right justify text | To right justify within a field of "n" characters, follow the ;R with that number. Right-justified data is not truncated; if "n" is not large enough, data spills into the next field's area causing confusing output. NUMERIC DATA TYPE fields are right justified by default. However, computed expressions with numeric results are not right justified automatically. |
| field;Sn | Skip lines between fields | You can indicate a number of lines
to skip before printing a field by using ;Sn.
Without a number, ;S skips a single line. If your
field has a null value, "n" lines are skipped
anyway. You cannot use ;S with a WORD-PROCESSING-type field. To skip one line before a WORD-PROCESSING field, precede the field with an additional print specification like this: THEN PRINT FIELD: "";S |
| field;T | Use field TITLE as header | If you want to use the field's TITLE, as defined in the data dictionary, instead of its LABEL in the header, add ;T. |
| field;Wn | Wrap text | The ;W suffix splits a field that is too long for its field column width at word boundaries (spaces) and prints it out fully on two or more rows. You can optionally follow the ;W with the number of column positions to be occupied by each line of output. If the field's data dictionary definition says to always print in word-wrap mode, WORD-PROCESSING DATA TYPEs are automatically wrapped. The ;W suffix overrides the ;R or ;L suffixes; do not use them together. |
| field;X | Suppress header and inter-column spaces | Follow the field specification with ;X to suppress the two spaces normally inserted before a field and the column header for the field. The result is concatenation of the field with the field that came before it. The ;X suffix is often used to add a literal caption to a field. |
| field;"xxx" | Customize header | The default header for columns of a
report is the field label (for fields) or a computed expression (for
"on the fly" computed expressions). To change the header, follow the
field label with a semicolon (";") and the column
header you want. Enclose the header in quotes. When possible, spaces
wrap the substitute header within a print width obtained from the
field's data definition. For example:
THEN PRINT FIELD: DOB;"Date of Birth"The first specification prints the header on two lines; the second prints it on one line (with underscores). To suppress the header, add ;"" to the field. NOTE: The tilde (~) character should never be used within a customized header because this character has a special meaning to FileMan. |
| field;Yn | Set start row position | You can start printing a field on any line on the page. If "n" is positive, the field is printed on that line as counted from the top of the page. If it is negative, it is printed on that line as counted from the bottom. When specifying ;Yn, you must account for any page header that is displayed. |
| "xxx" | Insert a literal | At the "PRINT FIELD:" prompt
enclose a free text literal in quotes. The literal is inserted into the
body of the report. For example, the following specifications begin
each entry's display with a caption and NAME:
FIRST PRINT FIELD: "Patient's name:" OR FIRST PRINT FIELD: "Patient's name:"NOTE: The header for the NAME field is suppressed in both examples. |
You can string together several of these print qualifiers at the "PRINT FIELD:" prompt. For example:
THEN PRINT FIELD: +WEIGHT;S1;C3;L6;"Patient Weight"
These specifications translate to: total, count, and give the mean for all values of the WEIGHT field, which must be a NUMERIC valued field. Skip one line before printing the values. Start the output in column three, left justify and truncate it to six character positions, and print the column heading "Patient Weight" on two lines.
PRINT templates let you store your print field specifications for use at a later time. You can retrieve the template at a later time by using the template name surrounded by square brackets. Template names must be unique with respect to any other PRINT template created for the same file. VA FileMan will notify you, if you try to create a template with a template name that already exists for a file. PRINT templates are stored in the PRINT TEMPLATE file (#.4).
To see a list of all existing templates that pertain to the file you are dealing with, enter a left bracket and a question mark ("[?") at the prompt where you can retrieve templates. For example:
FIRST PRINT FIELD: [?
This gives you a list of the PRINT templates available for your use with the file.
You are automatically prompted for a template name when it is determined that a considerable amount of information has been specified. If you choose five or more print fields, or if some of your print fields have special formatting specifications, you are prompted to store your print field specification in a PRINT template, as follows:
STORE PRINT LOGIC IN TEMPLATE:
If you do not want to store your specifications in a template, simply press the Enter/Return key. If you do want to save these print specifications for future reuse, however, respond to this prompt with the name of a template (either new or existing). Do not enclose the name in brackets; use brackets only to invoke a template, not to name one.
Forcing Creation of a PRINT Template
Ordinarily, you are only asked whether you want to save your PRINT template if you enter five or more fields at the "PRINT FIELD:" prompt, or enter complex print specifications. However, by entering a right bracket ("]") by itself at one of your field prompts, you can force the prompt that asks you for a template name, no matter how few fields you specify. You must designate at least one field to be printed to receive the template prompt, though.
For example:
PRINT FIELD: ]
PRINT FIELD: NAME
THEN PRINT FIELD:
HEADING:
 STORE PRINT LOGIC IN TEMPLATE: ID PRINT
Using and Editing PRINT Templates
If a PRINT template has already been defined for a file, you can answer the "FIRST PRINT FIELD:" prompt with the template name, enclosed within brackets. For example:
FIRST PRINT FIELD: [PATIENT DATA]
WANT TO EDIT 'PATIENT DATA' TEMPLATE? NO// Y
 NAME: PATIENT DATA//
READ ACCESS:
WRITE ACCESS:
After you retrieve a template that you yourself have created, you are asked if you want to edit the template. If you answer YES (as shown above), you are allowed to edit the template name. To delete the template, enter an at-sign ("@"). After the "NAME:" prompt, you can edit the template security codes for READ ACCESS and WRITE ACCESS.
Next, you are prompted to edit each "PRINT FIELD:" value, containing each print field stored in the template. You can leave each print field as is, edit it, or delete it with the at-sign character ("@").
To insert a new print field ahead of the print field being displayed in your template, precede the print field you want to insert with an up-arrow ("^"). See the following example of adding to a PRINT template (INPUT and SORT templates have this feature also):
FIRST PRINT FIELD: FIELD1//
THEN PRINT FIELD: FIELD2//
THEN PRINT FIELD: FIELD4// ^FIELD3
THEN PRINT FIELD: FIELD4//
To insert a Multiple field and its subfields ahead of the field currently displayed in the template, do the following:
For example:
FIRST PRINT FIELD: FIELD1//
THEN PRINT FIELD: FIELD2//
THEN PRINT FIELD: FIELD3// ^MultField (multiple)
 THEN PRINT MultField SUB-FIELD: FIELD3// ^SubField1
THEN PRINT MultField SUB-FIELD: FIELD3// ^SubField2
THEN PRINT MultField SUB-FIELD: FIELD3// ^]
THEN PRINT FIELD: FIELD3//
You can use Print Templates that others have created. Type [?] after the
FIRST PRINT FIELD:
prompt to see the names of all the PRINT TEMPLATES that you are allowed to use.
FIRST PRINT FIELD: [TEMPLATE NAME]
In this case, some developer has designated the Template whose name is shown as the 'canonic' template for this File. This will be the "most likely" kind of print output for the File. Either hit <return> to accept this default, or answer as above.
Every file has a pre-defined CAPTIONED PRINT template that you can select at the "PRINT FIELD:" prompt. The CAPTIONED PRINT Template can be very useful; it prints out all non-empty fields for each entry in your report. Use it is a quick way to get all the fields for each entry in your report (much quicker than entering each field individually)!
Use it as follows:
FIRST PRINT FIELD: [CAPTIONED
COMPUTED Fields and Record Numbers in CAPTIONED OUTPUT
When you choose the CAPTIONED PRINT Template, you're prompted with "Include COMPUTED fields". At this prompt, you can decide whether to include COMPUTED-type fields in the output for each record, as well as record numbers.
NOTE: For more information on COMPUTED fields, please refer to the "COMPUTED DATA TYPE" topic in the "VA FileMan Advanced User Manual."
FIRST PRINT FIELD: [CAPTIONED

 Include COMPUTED fields: (N/Y/R/B): NO// ?
Enter a code from the list.
Select one of the following:
N NO - No record number (IEN), no Computed Fields
Y Computed Fields
R Record Number (IEN)
B BOTH Computed Fields and Record Number (IEN)
Include COMPUTED fields: (N/Y/R/B): NO// BOTH Computed Fields and Record Number (IEN)

 *************************
 Heading (S/C): NEW PERSON LIST//
 DEVICE:
If you precede all of the fields that you choose for printing at the "PRINT FIELD:" prompts with a +, &, !, or #, the individual field values are not printed in your report. Instead, you only get the requested statistics, which (depending on the print qualifiers and fields used) can be the total, count, mean, maximum, minimum, and/or standard deviation.
NOTE: For more information about print qualifiers, please refer to the "Print Qualifier Reference" topic.
To generate more than one copy of a report, you must have an output device on your system (such as a spool device or a sequential disk processor [SDP]) which stores data in a linear format. If you choose to send the output to such a device at the "DEVICE:" prompt, the system prompts you as follows:
ENTER NUMBER OF COPIES: 4
OUTPUT COPIES TO DEVICE: PRINTER
In this example, you are asking to print four copies to the device called PRINTER.
You must be using VA FileMan with Kernel or with a device handler similar to Kernel's to produce multiple copies. If you exceed the maximum spool lines allowed you as defined in the KERNEL SYSTEM PARAMETERS file (#8989.3), your report will be stopped.
The heading in a report is what is printed at the top of each report page. Ordinarily, there is a heading (report title), date of report, time of report, page number, and column headers (field titles for fields in the output), as shown below:
 PATIENT LIST JUL 19,1996 14:49 PAGE 1
 SSN NAME
 -------------------------------------------------------------------
You can customize the report heading when you print. If you ask for Help at the "Heading (S/C):..." prompt, VA FileMan displays the following instructions:
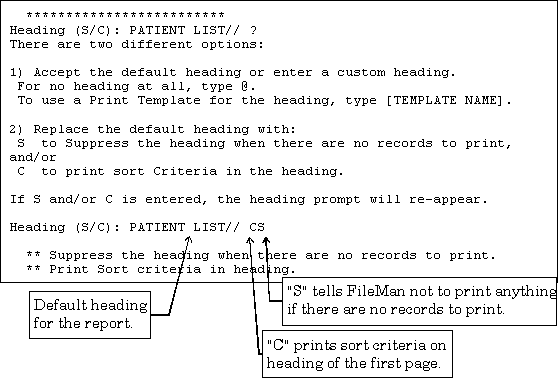
Thus, at the "Heading (S/C):" prompt, you can:
If you do not want headings to be printed in your output, enter an at-sign ("@") at the "HEADING:" prompt:
HEADING: PATIENT LIST// @
If you want neither headings nor page feeds in your output, enter two at-signs ("@@") at the "HEADING:" prompt.
If you suppress the headings in your output and also save your print criteria in a PRINT template, you will be asked:
DO YOU ALWAYS WANT TO SUPPRESS SUBHEADERS WHEN PRINTING TEMPLATE?
Subheaders are the names of SORT BY fields you see in the body of your report, when you don't include those SORT BY fields as print fields. To automatically suppress all subheaders, answer YES at this prompt.
NOTE: When you are sorting, you can suppress subheaders individually at each sort level by entering an at-sign ("@") in front of the field on which you are sorting. For more information, please refer to the "Sorting" topic.
You can print complex, multi-line headings by using a PRINT template to hold your heading format. Suppose, for example, that you want the patient's name and date of birth to appear as the heading at every page break. You could first create a PATIENT HEADER template as follows:
SORT BY: NAME
START WITH NAME: FIRST//
FIRST PRINT FIELD: "PATIENT NAME: "
 THEN PRINT FIELD: NAME
 THEN PRINT FIELD: "DATE OF BIRTH: ";C50
THEN PRINT FIELD: DATE OF BIRTH
THEN PRINT FIELD:
*************************
Heading (S/C): PATIENT LIST//
STORE PRINT LOGIC IN TEMPLATE: PATIENT HEADER
Are you adding 'PATIENT HEADER' as a new PRINT TEMPLATE? No// YES (Yes)
 DEVICE:
Then, at a later time, when you do another print, at the heading prompt, enter the template name:
Heading (S/C): PATIENT LIST// [PATIENT HEADER]
When you enter a PRINT template name such as PATIENT HEADER at the "Heading (S/C):..." prompt, the format of the template is used as a replacement for the full normal report heading on each page of your report (it replaces the full default heading, including title, time, date, page number, field names, and separator line). Thus, the header, as defined above, would contain no column headings and would not be separated from the body of the report by a horizontal line or even a blank line. You can add these in yourself as print fields in the template, if you so desire.
Custom Footers
You can also add footers to the bottom of each page of a report. First, save the contents of the footer in a template as you do to create a custom heading. Then, use the template at the "HEADING:" prompt with a dash ("-") before the first bracket:
Heading (S/C): PATIENT LIST// -[PATIENT FOOTER]
You can specify both a heading and a footer like this:
Heading (S/C): PATIENT LIST// [PATIENT HEADER]-[PATIENT FOOTER]
NOTE: Specifying only a footer at the "Heading (S/C):" prompt suppresses the default heading. If you need a header as well as footer, you must use custom templates for both.
You can print the sort criteria (values used to sort the report) in the header in two different ways:
Reviewed/Updated: October 2016