| Contents: | Main | Chapter | See Also: | Getting Started Manual | Programmer Manual | |||
The following examples of creating files/fields or editing fields in a file are illustrated using Screen Mode .
NOTE: These examples assume that the user does not have programmer access. For explanations of additional capabilities available to the programmer, please refer to the "Advanced File Definition" chapter in the "VA FileMan Programmer Manual."
The following example illustrates the file definition dialogue you see when creating a new file using the Modify File Attributes [DIMODIFY] option. In this case, we will create the ORDER file (#100, a standard VA FileMan file):
Select OPTION: MODIFY FILE ATTRIBUTES
DO YOU WANT TO USE THE SCREEN-MODE VERSION? Yes//   (Yes)

MODIFY WHAT FILE: ORDER
  Are you adding 'ORDER' as a new FILE?  No// Y   (Yes)
   FILE NUMBER:  99000// 100

...SORRY, HOLD ON...
     A FreeText NAME Field (#.01) has been created.


Select FIELD: NAME
VA FileMan prompts you to enter the file name. If it is a new file, VA FileMan will ask you to confirm that you want to add a new file. The default file number to the left of the "//" (e.g., 99000) is related to a site number that is assigned to your computer when VA FileMan is initialized. This file number is within the range of numbers assigned to your site. Be sure to follow local policies when assigning file numbers.
As you can see from this example, when a file is created a field with the label NAME and number .01 is automatically created. When creating a new file, you can change the definition of this field in the same way you can change the definition of any other field.
When you select a field (e.g., the NAME field), you will then be taken into a ScreenMan form where you can edit the properties of the field, as shown below:
In the following example, the DATA TYPE field for the RELEASE DATE/TIME field (#.68) in the ORDER file (#100) has a value of DATE/TIME:
Select OPTION: MODIFY FILE ATTRIBUTES
DO YOU WANT TO USE THE SCREEN-MODE VERSION? Yes//   (Yes)

MODIFY WHAT FILE: ORDER//


Select FIELD: RELEASE DATE/TIME
You will then be taken into a ScreenMan form where you can edit the properties of the field, as shown below:
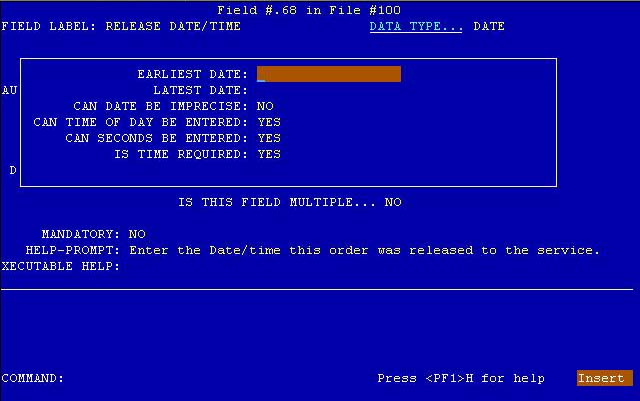
In Screen Mode, whenever the DATA TYPE field is editable, a "pop-up" window appears, containing editable attributes of the field that are pertinent to its specific Data Type. DATE/TIME-type fields don't have any required entries. You can accept all the default values within the "pop-up" window, simply by closing the window by pressing the "F1-C" keys.
NOTE: To delete the entire field, enter an at-sign ("@") at the "FIELD LABEL:" prompt.
In the following example, the DATA TYPE field for the FLAGGED field (#.61) in the ORDER file (#100) has a value of SET OF CODES:
Select OPTION: MODIFY FILE ATTRIBUTES
DO YOU WANT TO USE THE SCREEN-MODE VERSION? Yes//   (Yes)

MODIFY WHAT FILE: ORDER//


Select FIELD: FLAGGED
You will then be taken into a ScreenMan form where you can edit the properties of the field, as shown below:

In Screen Mode, whenever the DATA TYPE field is editable, a "pop-up" window appears, containing editable attributes of the field that are pertinent to its specific Data Type. SET OF CODES-type fields require input of all the allowable "Internal" values (i.e., "CODE" prompt), and their "External" equivalents (i.e., "WILL STAND FOR" prompt).
Using the <ArrowUp> and <ArrowDown> keys makes it easy to edit the codes. It is permissible to leave a blank row, but every Internal Code (i.e., "CODE," on the left) must have a corresponding External Code ("WILL STAND FOR," on the right), and vice versa.
In the following example, the DATA TYPE field for the REASON FOR FLAG field (#.67) in the ORDER file (#100) has a value of FREE TEXT:
Select OPTION: MODIFY FILE ATTRIBUTES
DO YOU WANT TO USE THE SCREEN-MODE VERSION? Yes//   (Yes)

MODIFY WHAT FILE: ORDER//


Select FIELD: REASON FOR FLAG
You will then be taken into a ScreenMan form where you can edit the properties of the field, as shown below:

In Screen Mode, whenever the DATA TYPE field is editable, a "pop-up" window appears, containing editable attributes of the field that are pertinent to its specific Data Type. FREE TEXT-type fields require input for the "MINIMUM" and "MAXIMUM" lengths of the field. In this example, users must enter from 1 to 80 characters for this field.
If included, the PATTERN MATCH must be written in M. For example, you can insure that the data value will not start with a punctuation character by entering a PATTERN MATCH of "X'?1P.E". This is a good check to make on a field that is allowed to be just one character in length. Sometimes, users may mistype and answer a field prompt with "/" (same key as "?") or some other meaningless punctuation character. A PATTERN MATCH check such as "X'?1P.E" will keep that kind of mistake out of your database.
In the following example, the DATA TYPE field for the ORDER TEXT field (#.11) in the ORDER file (#100) has a value of WORD-PROCESSING:
Select OPTION: MODIFY FILE ATTRIBUTES
DO YOU WANT TO USE THE SCREEN-MODE VERSION? Yes//   (Yes)

MODIFY WHAT FILE: ORDER//


Select FIELD: ORDER TEXT
You will then be taken into a ScreenMan form where you can edit the properties of the field, as shown below:
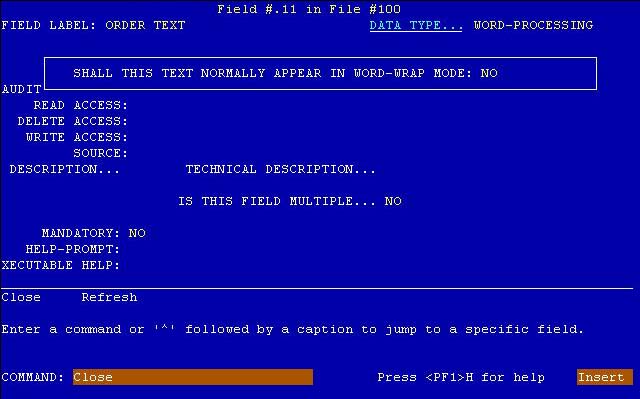
In Screen Mode, whenever the DATA TYPE field is editable, a "pop-up" window appears, containing editable attributes of the field that are pertinent to its specific DATA TYPE. With WORD-PROCESSING-type fields VA FileMan asks only one question in the "pop-up" window (i.e., "SHALL THIS TEXT NORMALLY APPEAR IN WORD-WRAP MODE"). If you answer YES to this question, text is automatically wrapped at word boundaries to fit in the column in which it is being printed.
NOTE: When it is important that lines of text be printed exactly as they were entered, answer NO to the "SHALL THIS TEXT NORMALLY APPEAR IN WORD-WRAP MODE" question.
In the following example, the DATA TYPE field for the JUST RELEASED field (#1000) in the ORDER file (#100) has a value of COMPUTED:
Select OPTION: MODIFY FILE ATTRIBUTES
DO YOU WANT TO USE THE SCREEN-MODE VERSION? Yes//   (Yes)

MODIFY WHAT FILE: ORDER//


Select FIELD: JUST RELEASED
You will then be taken into a ScreenMan form where you can edit the properties of the field, as shown below:
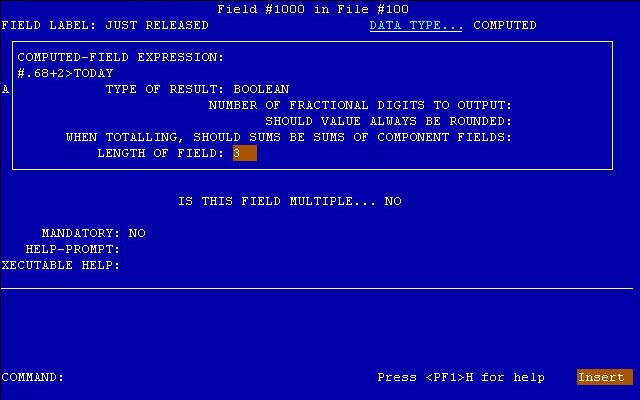
In Screen Mode, whenever the DATA TYPE field is editable, a "pop-up" window appears, containing editable attributes of the field that are pertinent to its specific Data Type. With COMPUTED-type fields VA FileMan displays the characteristics of the computed expression in the "pop-up" window. The syntax of these expressions is explained fully in the "Computed Expressions" chapter. Field #.68 is the RELEASE DATE/TIME field. The JUST RELEASED field will be TRUE if the RELEASE DATE/TIME was less than two days ago.
NOTE: We can specify this virtual value to be BOOLEAN, STRING-VALUED, DATE-VALUED, or NUMERIC. Only in the last case are the three fields following the "TYPE OF RESULT" prompt editable.
In the following example, the DATA TYPE field for the WHO ENTERED field (#3) in the ORDER file (#100) has a value of POINTER TO A FILE:
Select OPTION: MODIFY FILE ATTRIBUTES
DO YOU WANT TO USE THE SCREEN-MODE VERSION? Yes//   (Yes)

MODIFY WHAT FILE: ORDER//


Select FIELD: WHO ENTERED
You will then be taken into a ScreenMan form where you can edit the properties of the field, as shown below:
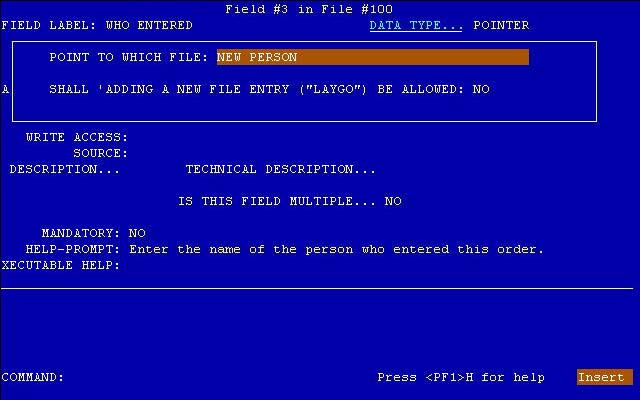
In Screen Mode, whenever the DATA TYPE field is editable, a "pop-up" window appears, containing editable attributes of the field that are pertinent to its specific Data Type. With POINTER TO A FILE-type fields VA FileMan asks you to enter the pointed-to file name in the "pop-up" window. The file that is pointed to (in this case, the NEW PERSON file) must already exist on your system. If you enter a ? (single question mark) at this prompt, you will be presented with a list of the available files from which you can choose.
By answering NO to the "LAYGO" question, you insure that users who are editing the "WHO ENTERED" data are not able to add a new entry on the fly to the NEW PERSON file.
In the following example, the DATA TYPE field for the ITEM ORDERED field (#7) in the ORDER file (#100) has a value of VARIABLE-POINTER:
Select OPTION: MODIFY FILE ATTRIBUTES
DO YOU WANT TO USE THE SCREEN-MODE VERSION? Yes//   (Yes)

MODIFY WHAT FILE: ORDER//


Select FIELD: ITEM ORDERED
You will then be taken into a ScreenMan form where you can edit the properties of the field, as shown below:
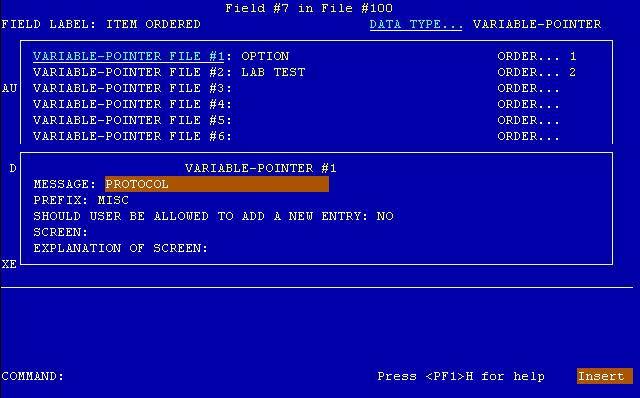
In Screen Mode, whenever the DATA TYPE field is editable, a "pop-up" window appears, containing editable attributes of the field that are pertinent to its specific Data Type. With VARIABLE-POINTER-type fields VA FileMan asks you to enter the pointed-to file name and its order in the first "pop-up" window. In this case, the first VARIABLE-POINTER file entered was the OPTION file, which would already have to exist. The ORDER was also set to one. When you press the Enter/Return key at the "ORDER" prompt for each VARIABLE-POINTER, there is an additional "pop-up" window (i.e., a "pop-up window within the pop-up window"). The additional questions pertaining to the VARIABLE-POINTER file you are currently entering will appear in this secondary "pop-up" window.
As you can see in this example, the OPTION file's MESSAGE, is associated with "PROTOCOL." Since its ORDER is one, it is the first file searched. The PREFIX "MISC" can also be used to refer to the OPTION file. Just as with the WHO ENTERED POINTER TO A FILE field (previously described), users cannot add new options to the OPTION file on the fly when they are entering an ITEM ORDERED in the ORDER file because the "SHOULD USER BE ALLOWED TO ADD A NEW ENTRY:" prompt is NO.
In the following example, the DATA TYPE field for the BOOLEAN field (#12) in a sample file (#123000001) has a value of BOOLEAN:
Select OPTION: MODIFY FILE ATTRIBUTES
DO YOU WANT TO USE THE SCREEN-MODE VERSION? Yes//   (Yes)

MODIFY WHAT FILE: 123000001

Select FIELD: BOOLEAN
You will then be taken into a ScreenMan form where you can edit the properties of the field. The form is laid out as follows:
                       Field #12 in File #123000001
FIELD LABEL: BOOLEAN                            DATA TYPE... BOOLEAN

          TITLE:
          AUDIT:
AUDIT CONDITION:
    READ ACCESS:
  DELETE ACCESS:
   WRITE ACCESS:
         SOURCE:
 DESCRIPTION...          TECHNICAL DESCRIPTION...

                        IS THIS FIELD MULTIPLE... NO

     MANDATORY: NO
   HELP-PROMPT:
XECUTABLE HELP:
________________________________________________________________________________


COMMAND:                                              Press <F1>H for help    Insert
There are no "pop-up" edits to perform for the BOOLEAN data type.
NOTE: To delete the entire field, enter an at-sign ("@") at the "FIELD LABEL:" prompt.
In the following example, the DATA TYPE field for the LABEL REFERENCE field (#13) in a sample file (#123000001) has a value of LABEL REFERENCE:
Select OPTION: MODIFY FILE ATTRIBUTES
DO YOU WANT TO USE THE SCREEN-MODE VERSION? Yes//   (Yes)

MODIFY WHAT FILE: 123000001

Select FIELD: LABEL REFERENCE
You will then be taken into a ScreenMan form where you can edit the properties of the field. The form is laid out as follows:
                     Field #13 in File #123000001
FIELD LABEL: LABEL REFERENCE                  DATA TYPE... LABEL REFERENCE

          TITLE:
          AUDIT:
AUDIT CONDITION:
    READ ACCESS:
  DELETE ACCESS:
   WRITE ACCESS:
         SOURCE:
 DESCRIPTION...          TECHNICAL DESCRIPTION...

                        IS THIS FIELD MULTIPLE... NO

     MANDATORY: NO
   HELP-PROMPT:
XECUTABLE HELP:
________________________________________________________________________________

PARAMETERS ALLOWED: YES


COMMAND:                                              Press <F1>H for help    Insert
The LABEL REFERENCE data type has one "pop-up" question, which asks the developer "PARAMETERS ALLOWED:" with the LABEL REFERENCE entry.
Since the LABEL REFERENCE field can include a caret ("^"), VA FileMan uses extract storage instead of piece storage and uses "E1,99" as the default at the "PIECE POSITION" prompt. It is advisable to create the field on a node by itself.
NOTE: Putting multiple fields on the same node where some of the fields use the Em,n format can cause the inclusion of padding when displaying the data.
NOTE: To delete the entire field, enter an at-sign ("@") at the "FIELD LABEL:" prompt.
In the following example, the DATA TYPE field for the TIME field (#14) in a sample file (#123000001) has a value of TIME:
Select OPTION: MODIFY FILE ATTRIBUTES
DO YOU WANT TO USE THE SCREEN-MODE VERSION? Yes//   (Yes)

MODIFY WHAT FILE: 123000001

Select FIELD: TIME
You will then be taken into a ScreenMan form where you can edit the properties of the field. The form is laid out as follows:
                       Field #14 in File #123000001
FIELD LABEL: TIME                                DATA TYPE... TIME

          TITLE:
          AUDIT:
AUDIT CONDITION:
    READ ACCESS:
  DELETE ACCESS:
   WRITE ACCESS:
         SOURCE:
 DESCRIPTION...          TECHNICAL DESCRIPTION...

                        IS THIS FIELD MULTIPLE... NO

     MANDATORY: NO
   HELP-PROMPT:
XECUTABLE HELP:
________________________________________________________________________________

SECONDS ALLOWED: YES//


COMMAND:                                              Press <F1>H for help    Insert
The TIME data type has one "pop-up" question, which asks the developer "SECONDS ALLOWED: YES//" with the TIME entry.
NOTE: To delete the entire field, enter an at-sign ("@") at the "FIELD LABEL:" prompt.
In the following example, the DATA TYPE field for the YEAR field (#15) in a sample file (#123000001) has a value of YEAR:
Select OPTION: MODIFY FILE ATTRIBUTES
DO YOU WANT TO USE THE SCREEN-MODE VERSION? Yes//   (Yes)

MODIFY WHAT FILE: 123000001

Select FIELD: YEAR
You will then be taken into a ScreenMan form where you can edit the properties of the field. The form is laid out as follows:
                       Field #15 in File #123000001
FIELD LABEL: YEAR                                DATA TYPE... YEAR

          TITLE:
          AUDIT:
AUDIT CONDITION:
    READ ACCESS:
  DELETE ACCESS:
   WRITE ACCESS:
         SOURCE:
 DESCRIPTION...          TECHNICAL DESCRIPTION...

                        IS THIS FIELD MULTIPLE... NO

     MANDATORY: NO
   HELP-PROMPT:
XECUTABLE HELP:
________________________________________________________________________________

EARLIEST DATE: 1/1/2017


COMMAND:                                              Press <F1>H for help    Insert
The YEAR data type has one "pop-up" question, which asks the developer for the "EARLIEST DATE:" allowed with the YEAR entry.
NOTE: To delete the entire field, enter an at-sign ("@") at the "FIELD LABEL:" prompt.
In the following example, the DATA TYPE field for the UTC field (#8) in a sample file (#123000001) has a value of UNIVERSAL TIME:
Select OPTION: MODIFY FILE ATTRIBUTES
DO YOU WANT TO USE THE SCREEN-MODE VERSION? Yes//   (Yes)

MODIFY WHAT FILE: 123000001

Select FIELD: UTC
You will then be taken into a ScreenMan form where you can edit the properties of the field. The form is laid out as follows:
                       Field #8 in File #123000001
FIELD LABEL: UTC                                DATA TYPE... UNIVERSAL TIME

          TITLE:
          AUDIT:
AUDIT CONDITION:
    READ ACCESS:
  DELETE ACCESS:
   WRITE ACCESS:
         SOURCE:
 DESCRIPTION...          TECHNICAL DESCRIPTION...

                        IS THIS FIELD MULTIPLE... NO

     MANDATORY: NO
   HELP-PROMPT:
XECUTABLE HELP:
________________________________________________________________________________


COMMAND:                                              Press <F1>H for help    Insert
There are no "pop-up" edits to perform for the UNIVERSAL TIME data type.
NOTE: To delete the entire field, enter an at-sign ("@") at the "FIELD LABEL:" prompt.
In the following example, the DATA TYPE field for the FT POINTER field (#9) in a sample file (#123000001) has a value of FT POINTER:
Select OPTION: MODIFY FILE ATTRIBUTES
DO YOU WANT TO USE THE SCREEN-MODE VERSION? Yes//   (Yes)

MODIFY WHAT FILE: 123000001

Select FIELD: FT POINTER
You will then be taken into a ScreenMan form where you can edit the properties of the field. The form is laid out as follows:
                       Field #9 in File #123000001
FIELD LABEL: FT POINTER                         DATA TYPE... FT POINTER

          TITLE:
          AUDIT:
AUDIT CONDITION:
    READ ACCESS:
  DELETE ACCESS:
   WRITE ACCESS:
         SOURCE:
 DESCRIPTION...          TECHNICAL DESCRIPTION...

                        IS THIS FIELD MULTIPLE... NO

     MANDATORY: NO
   HELP-PROMPT: ENTER THE FREE TEXT POINTER
XECUTABLE HELP:
________________________________________________________________________________

POINTER: VA(200,
LAYGO: YES//


COMMAND:                                              Press <F1>H for help    Insert
The FT POINTER data type asks the developer to enter an open global root to the pointed-to file at the "POINTER:" prompt. It also asks if adding new entries is allowed at the "LAYGO: YES//" prompt.
NOTE: To delete the entire field, enter an at-sign ("@") at the "FIELD LABEL:" prompt.
In the following example, the DATA TYPE field for the FT DATE field (#10) in a sample file (#123000001) has a value of FT DATE:
Select OPTION: MODIFY FILE ATTRIBUTES
DO YOU WANT TO USE THE SCREEN-MODE VERSION? Yes//   (Yes)

MODIFY WHAT FILE: 123000001

Select FIELD: FT DATE
You will then be taken into a ScreenMan form where you can edit the properties of the field. The form is laid out as follows:
                       Field #10 in File #123000001
FIELD LABEL: FT DATE                            DATA TYPE... FT DATE

          TITLE:
          AUDIT:
AUDIT CONDITION:
    READ ACCESS:
  DELETE ACCESS:
   WRITE ACCESS:
         SOURCE:
 DESCRIPTION...          TECHNICAL DESCRIPTION...

                        IS THIS FIELD MULTIPLE... NO

     MANDATORY: NO
   HELP-PROMPT:
XECUTABLE HELP:
________________________________________________________________________________

EARLIEST DATE:  1/1/2017
IMPRECISE DATE: NO//
TIME OF DAY:    YES//
TIME REQUIRED:  YES
SECONDS ALLOWED: YES//


COMMAND:                                              Press <F1>H for help    Insert
The FT DATE data type has several "pop-up" edits to perform:
NOTE: To delete the entire field, enter an at-sign ("@") at the "FIELD LABEL:" prompt.
In the following example, the DATA TYPE field for the RATIO field (#11) in a sample file (#123000001) has a value of RATIO:
Select OPTION: MODIFY FILE ATTRIBUTES
DO YOU WANT TO USE THE SCREEN-MODE VERSION? Yes//   (Yes)

MODIFY WHAT FILE: 123000001

Select FIELD: RATIO
You will then be taken into a ScreenMan form where you can edit the properties of the field. The form is laid out as follows:
                       Field #11 in File #123000001
FIELD LABEL: RATIO                              DATA TYPE... RATIO

          TITLE:
          AUDIT:
AUDIT CONDITION:
    READ ACCESS:
  DELETE ACCESS:
   WRITE ACCESS:
         SOURCE:
 DESCRIPTION...          TECHNICAL DESCRIPTION...

                        IS THIS FIELD MULTIPLE... NO

     MANDATORY: NO
   HELP-PROMPT: ENTER THE RATIO
XECUTABLE HELP:
________________________________________________________________________________

LEFT SIDE MINIMUM: (0-9999):  1
LEFT SIDE MAXIMUM: (1-9999):  10
RIGHT SIDE MINIMUM: (1-9999): 1
RIGHT SIDE MAXIMUM: (1-9999): 20


COMMAND:                                              Press <F1>H for help    Insert
The RATIO data type asks the developer to enter MINIMUM and MAXIMUM values for each numeric value in the ratio (left side and right side, with allowed ranges shown in parentheses next to each prompt).
NOTE: To delete the entire field, enter an at-sign ("@") at the "FIELD LABEL:" prompt.
The following example illustrates creating a Multiple field. For this example, we will simulate creating the RESPONSES field (#4.5) in the ORDER file (#100). It has a Data Type of NUMERIC:
Select OPTION: MODIFY FILE ATTRIBUTES
DO YOU WANT TO USE THE SCREEN-MODE VERSION? Yes//   (Yes)

MODIFY WHAT FILE: ORDER//


Select FIELD: RESPONSES
  Are you adding 'RESPONSES' as a new FIELD? No// Y   (Yes)
  FIELD NUMBER: 4.5//
You will then be taken into a ScreenMan form where you can edit the properties of the field, as shown below:
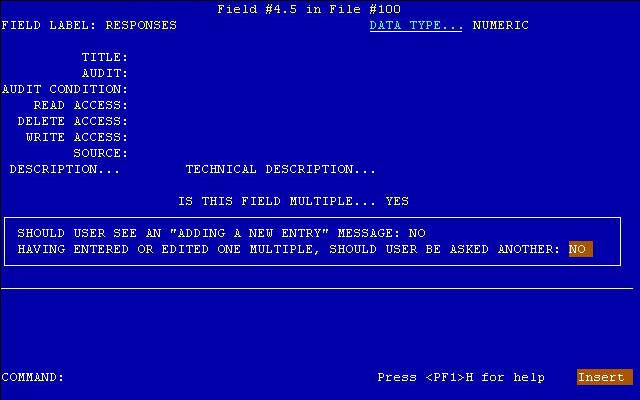
A Multiple field is created just as any other, except that the "IS THIS FIELD MULTIPLE..." question is answered YES. In Screen Mode, after answering YES to this question, a "pop-up" window appears containing editable attributes pertinent to a Multiple field. With Multiple-type fields, VA FileMan asks if you want users to be notified when they are adding new entries and if users should be asked if they want to make another entry. In this case, we answered NO to both questions.
To create or edit Subfields of a Multiple field, select a Multiple-valued field (e.g., the RESPONSES Multiple field, previously created):
Select OPTION: MODIFY FILE ATTRIBUTES
DO YOU WANT TO USE THE SCREEN-MODE VERSION? Yes//   (Yes)

MODIFY WHAT FILE: ORDER//


Select FIELD: RESPONSES  (multiple)
You will then be taken into a ScreenMan form where you can edit the properties of the field, as shown below:

In Screen Mode, after entering a Multiple field, a special screen appears that displays information about the Multiple as a whole.
NOTE: If you wanted to delete the entire Multiple field, you would enter an at-sign ("@") at the "MULTIPLE-FIELD LABEL" prompt.
After viewing this screen, you can proceed to add fields to the Multiple or to edit existing Subfields. This is done at the "Select SUB-FIELD:" prompt that is displayed when you exit Screen Mode (shown below).
After selecting a Multiple-valued field (e.g., the RESPONSES Multiple field in the ORDER file), you can enter or modify the Multiple's subfields by entering the field's number or name (label) at the "Select xxxxxxx SUB-FIELD:" prompt (where xxxxxxx represents the name of the Multiple).
A .01 field with the same name as the Multiple field was added automatically when the field was identified as a Multiple. The .01 field is the identifying key for an entry in the Subfile (Multiple); it is similar to a file's .01 field, which is the file's identifying key. In the following example, the .01 subfield is edited to have a Data Type of NUMERIC:
Select RESPONSES SUB-FIELD: .01 ITEM ENTRY
You will then be taken into a ScreenMan form where you can edit the properties of the subfield, as shown below:
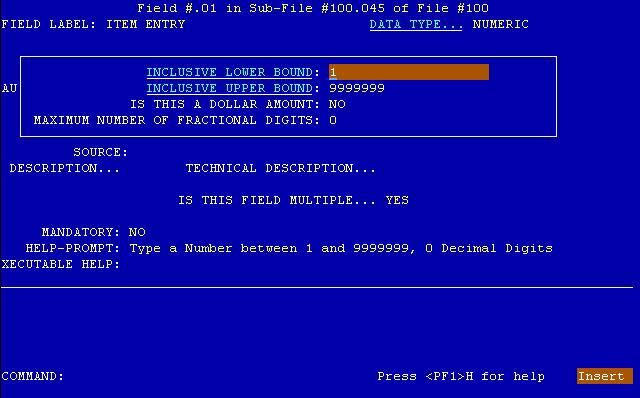
In Screen Mode, while editing a sub-field of a Multiple, you will notice that the heading at the top of the screen reminds you that you are now editing a field within a Multiple (e.g., "Field #.01 in Sub-File #100.045 of File #100").
Also, whenever the DATA TYPE field is editable, a "pop-up" window appears, containing editable attributes of the field that are pertinent to its specific Data Type. With NUMERIC-type fields VA FileMan asks you to enter the "INCLUSIVE LOWER BOUND" (e.g., set to 1) and the "INCLUSIVE UPPER BOUND (e.g., set to 9999999). In addition, you are asked if the numeric value is a dollar amount and if decimal digits will be allowed (i.e., the "MAXIMUM NUMBER OF FRACTIONAL DIGITS").
A default Help prompt is automatically written for you with the NUMERIC Data Type. In this case, the English message "Type a Number between 1 and 9999999, 0 Decimal Digits" has been built automatically from the specifications. As always, you can accept the default Help prompt or change it using the Replace ... With syntax.
NOTE: This Help information is displayed when the user inputs a single question mark ("?") when editing this field.
Reviewed/Updated: June 2026