Authors: Sam Habiel
License:
Attributions: Original instructions by Fil Beza and Nancy Anthracite; this set has been updated by Sam Habiel. Last updated in January 2019.
If you have reached this point, it means that you have finished Install Cache; or Install GT.M/YottaDB and Install VistA on GT.M/YottaDB.
YottaDB is a fork of GT.M. In VistA, everything that says GT.M will work equally well for YottaDB. When running ^ZTMGRSET or ^DINIT, choose GT.M on Unix for YottaDB.
Before there were REPLs, Mumps always has had something called Direct Mode, also known as Programmer Mode, which is a simplified REPL. Normally, end users are not allowed to access Programmer Mode as it is essentially like running as root on a Unix System.
To connect to VISTA and start configuring it, you need a terminal emulator that emulates VT-100, VT-220, VT-320 or VT-52. By default, most terminal emulators do that already, but you cannot use the rxvt terminal emulator.
If you modified your $TERM, you need to make sure it's either xterm or ansi. Others generally will work, but I am sure of these two.
To get into Direct Mode using Cache, on Windows you need to right click on the Cache Cube and choose Terminal. If you have a licensed version of Cache, you can also use Telnet to connect to the Terminal. Please note that Windows Telnet does not emulate VT-200 series terminals properly, so you may have some issues with it. If you want to use Telnet, I recommend downloading PuTTY (http://www.chiark.greenend.org.uk/~sgtatham/putty/) or TeraTerm (https://ttssh2.osdn.jp/index.html.en).
If you use PuTTY, change the function key bindings so that they behave like VT-100+. See here: https://the.earth.li/~sgtatham/putty/0.58/htmldoc/Chapter4.html#config-funkeys.
On a Mac, Terminal is a fully featured terminal emulator. You may wish to use System Preferences to configure the function keys to send Function commands, rather than dimming your screen or muting your volume. Otherwise, you have to use FN all the time to override the function keys (https://support.apple.com/en-us/HT204436).
On Linux, you can use any Terminal Emulator program with the exception of rxvt. You can actually even use PuTTY on Linux. In some emulators, F1 may be bound to do help. You need to unmap that in the Terminal application (http://askubuntu.com/questions/37313/how-do-i-deactivate-f1-and-f10-keybindings-in-gnome-terminal).
If a VistA system was installed by you or somebody else in the "Cloud", you will almost certainly need to use Secure Shell (SSH) to log in. SSH is a protocol written in the mid-90s to replace Telnet. It's the standard of connecting to other computers on the Cloud. Nobody can see the traffic inside of SSH, whereas Telnet is just plain text. The ssh client comes installed by default in all Unices; on Windows, you can use PuTTY or TeraTerm.
After you open your terminal emulator, do the following:
If your VistA is hosted on a remote server, connect to that first.
On Cache on Linux or Mac, you need to run ccontrol list to find your instance name, and then run csession <instance name>.
On GT.M/YottaDB, you need to source your environment file. If you followed this guide, it should be in /var/db/<name> as env.vista. To source, type . /var/db/<name>/env.vista (The dot is all by itself, followed by a space). Then type mumps -dir to go into direct mode.
You will see something like this:
GTM>
or in Cache:
USER>
If you are in Cache, you need to switch namespaces. (If you don't remember, type ? to see your choices.)
>D ^%CD

NAMESPACE// VISTA
Due to the fact that Cache does not enforce the M standard as strictly, many illegal instructions have been incorporated into VistA code. In addition, neither Cache nor GT.M/YottaDB is fully M95 standards compliant. As a result, ensuring that new code supports both systems is something of a game. For these reasons, the hardhats community maintains fixes for these routines and, when possible, sends the fixes back to the VA. In the future, the OSEHRA repositories will contain the fixes so that end users don't have to download the code and fix it themselves.
The WorldVistA distribution of VistA already includes the below fixes.
If you downloaded vxVistA or FOIA VistA, you need to copy the routines from this repository to your routines directory: https://github.com/shabiel/Kernel-GTM. Here's how to do it:
$ wget https://github.com/shabiel/Kernel-GTM/releases/download/XU-8.0-10004/virgin_install.zip
$ unzip virgin_install.zip -d /path/to/database/r/
This fixes the Kernel. There are some small fixes needed in random places in VistA, a total of about 5 routines. The fixes can be found in this repo: https://github.com/shabiel/foia-vista-fixes. You can get it like this
$ wget https://github.com/shabiel/foia-vista-fixes/archive/master.zip -O foia-vista-fixes.zip
$ unzip -j foia-vista-fixes.zip *.m -d /path/to/database/r/The evaluation version of Cache won't let you run more than one foreground process and 20 background processes. You can certainly configure VistA, but don't try to run the RPC broker. A friend wasted a lot of my time because he had an evaluation version and couldn't start the RPC broker. You may also need to restart Cache repeatedly, as it sometimes "forgets" that you logged off.
In the excerpts below, you will enter Mumps (M) commands into direct mode. Here are a few interesting ones:
S DUZ=.5 ; S is a shortcut for SET, DUZ means user number; .5 is a user that is always present on VistA systems.

D ^XUP ; D is a shortcut for DO, ^XUP is the name of the routine. ^XUP is the programmer mode menu runner.

; A semicolon, like in GAS assembly, is the comment character. M, like C, was written to replace assembly.

D Q^DI ; Do starting from Label Q in Routine DI. Q^DI is how to enter Fileman.There are a few confusing conventions that outsiders don't understand right away. Here they are:
// means that the preceding text is the default. If you press enter, you will accept it.Replace means that the existing text is long and you can edit it. Typing ... means that you will replace the entire thing;END appends to the end. You can also use ... to signify a range between two elements in the existing text. You can also enter a unique segment of the text, press enter, and at the with prompt put in what you want to replace that bit of text with. If you don't type anything in, it deletes that part of the text.@ deletes an item.^ usually lets you quit what you are in the middle of.^FIELD NAME lets you jump to a field while editing other fields. You may be blocked, depending on what the programmer decided to allow.? Short Help. Typically it tells you that you need to type a number or text.?? More Help. Should tell you what the field you are filling does. In the menu system, show all menus with what security keys they need.??? In the menu system, display help for each immediate submenu.???? In the menu system, display help for current menu.<enter> key is the main navigation key in VistA. Typing it after an entry enters that entry; typing when nothing is entered will move you forward or up, depending on the context.Select <item> Whenever you see select, you can select or add an item; after that, you can edit it.Spacebar <enter> Most of the time, VistA remembers the last entry you made for a particular field. To make the same entry again, do spacebar enter.You need to either invent or be given a few pieces of data:
WWW.HABIEL.NAME.FORUM.OSEHRA.ORG.Some of the configuration items below are taken from a system that may have had these entries previously created. If what you see on your screen doesn't exactly match what you see here, you can reply to Fileman with "Y" when adding a new entry; and skip past the fields that are indented by pressing <enter>. What matters in the end is that the final entry matches what is typed here.
The routine ZTMGRSET defines VistA global variables and saves system wide M routines that are M and OS specific. We need to kill ^%ZOSF to make sure we don't have old answers here; and sometimes having ^%ZOSF when you have just switched M implementations causes a catch 22 problem. The text scrape below is for GT.M/YottaDB; the one for Cache follows it.
>K ^%ZOSF

>D ^ZTMGRSET


ZTMGRSET Version 8.0 Patch level **34,36,69,94,121,127,136,191,275,355,446,584**
HELLO! I exist to assist you in correctly initializing the current account.
Which MUMPS system should I install?

1 = VAX DSM(V6), VAX DSM(V7)
2 = MSM-PC/PLUS, MSM for NT or UNIX
3 = Cache (VMS, NT, Linux), OpenM-NT
4 =
5 =
6 =
7 = GT.M (VMS)
8 = GT.M (Unix)
System: 8

I will now rename a group of routines specific to your operating system.
Routine:  ZOSVGUX Loaded, Saved as    %ZOSV

Routine:  ZIS4GTM Loaded, Saved as    %ZIS4
Routine:  ZISFGTM Loaded, Saved as    %ZISF
Routine:  ZISHGTM Loaded, Saved as    %ZISH
Routine:  XUCIGTM Loaded, Saved as    %XUCI
Routine: ZOSV2GTM Loaded, Saved as   %ZOSV2
Routine:  ZISTCPS Loaded, Saved as %ZISTCPS

NAME OF MANAGER'S UCI,VOLUME SET: VAH,ROU//
The value of PRODUCTION will be used in the GETENV api.
PRODUCTION (SIGN-ON) UCI,VOLUME SET: VAH,ROU//
The VOLUME name must match the one in PRODUCTION.
NAME OF VOLUME SET: ROU//
The temp directory for the system: '/tmp/'// <enter>
^%ZOSF setup


Now to load routines common to all systems.
Routine:   ZTLOAD Loaded, Saved as  %ZTLOAD
Routine:  ZTLOAD1 Loaded, Saved as %ZTLOAD1
Routine:  ZTLOAD2 Loaded, Saved as %ZTLOAD2
Routine:  ZTLOAD3 Loaded, Saved as %ZTLOAD3

...

Routine:   ZTRDEL Loaded, Saved as  %ZTRDEL
Routine:   ZTMOVE Loaded, Saved as  %ZTMOVE
Routine:    ZTBKC Loaded, Saved as   %ZTBKC
Want to rename the Fileman routines: No// Y
Routine:     DIDT Loaded, Saved as      %DT
Routine:    DIDTC Loaded, Saved as     %DTC
Routine:    DIRCR Loaded, Saved as     %RCR
Setting ^%ZIS('C')

Now, I will check your % globals...........

ALL DONE
>
On Cache, you will see different prompts.
NAME OF MANAGER'S NAMESPACE: VISTA// <enter>

PRODUCTION (SIGN-ON) NAMESPACE: VISTA// <enter>

NAME OF THIS CONFIGURATION: VISTA// <enter>
Initialize Fileman to set your domain name and number and Operating System (GT.M/YottaDB shown below).
>D ^DINIT

VA Fileman V.22.2

Initialize VA Fileman now?  NO// Y

    SITE NAME: PLA.ISC-WASH.DOMAIN.EXT// DEMO.OSEHRA.ORG

SITE NUMBER: 122000// 999

Now loading MUMPS Operating System File

Do you want to change the MUMPS OPERATING SYSTEM File? NO//....

Now loading DIALOG and LANGUAGE Files.......................................

TYPE OF MUMPS SYSTEM YOU ARE USING: CACHE/OpenM// ?
    Answer with MUMPS OPERATING SYSTEM NAME
   Choose from:
   CACHE/OpenM
   DSM for OpenVMS
   DTM-PC
   GT.M(UNIX)
   GT.M(VAX)
   MSM
   OTHER

TYPE OF MUMPS SYSTEM YOU ARE USING: CACHE/OpenM// GT.M(UNIX)

Now loading other Fileman files--please
wait........................................................................

The following files have been installed:
   .11     INDEX
   .2      DESTINATION
   .31     KEY

   ...

  1.5219   SQLI_FOREIGN_KEY
  1.52191  SQLI_ERROR_TEXT
  1.52192  SQLI_ERROR_LOG


Re-indexing entries in the DIALOG file..........................

Compiling all forms ...

   DICATT                          (#.001)
   DIPTED                          (#.1001)
   DIKC EDIT                       (#.1101)

   ...

   SPNLP MS FM1                    (#45)
   SPNE ENTER/EDIT SYNONYM         (#46)
   LREPI                           (#47)

File #80 does not contain a field #3.
THE FORM "LREPI" COULD NOT BE COMPILED.

   ENPR MS                         (#48)
   ENPR ALL                        (#49)
   ENPR PRELIM                     (#50)

   ...

   PXRM TAXONOMY EDIT              (#125)
   PXRM TAXONOMY CHANGE LOG        (#126)
   PXRM DIALOG TAXONOMY EDIT       (#127)


INITIALIZATION COMPLETED IN 4 SECONDS.
>
Also run D ^ZUSET to choose the correct version of ZU, the key login routine for the roll and scroll portions of VistA (GT.M/YottaDB shown).
D ^ZUSET

This routine will rename the correct routine to ZU for you.

Rename ZUGTM to ZU, OK? No// Y
Routine ZUGTM was renamed to ZU
Next is to set-up 4 devices: NULL, CONSOLE, VIRTUAL (historically known as TELNET, due to usual access assignments), and HFS. The NULL device corresponds to a place where we dump data we don't want; that's /dev/null on all Unices; //./nul on Windows. The NULL device is also known as the "BIT BUCKET", for obvious reasons.
CONSOLE stands for the device the terminal presents itself as if directly connected to a computer. These days, no computer has real console devices. Linux still has an emulated console device: /dev/tty. Cache Terminal presents a console device called |TRM|.
VIRTUAL stands for all connections from Virtual Emulators. Unfortunately every different operating system provides a different console device:
/dev/pts (Use with both Cache and GT.M/YottaDB)/dev/ttys (ditto)/dev/cons (GT.M [no YottaDB port for Cygwin exists])|TNT| (Cache/Windows ONLY)The way set up devices is to edit the DEVICE file in Fileman, the Database Management System for VistA. Unlike most databases in the market, it provides a user interface as well, albeit a text-based one. To get into Fileman, you need to set your user (DUZ) to .5, and then go in.
There should only be one device named "NULL". Unfortunately, there are three NULLs of various flavors in the FOIA; we need to make sure there is only one. The following procedure allows you to rename the nulls we don't want, and then delete a synonym.
>S DUZ=.5
D Q^DI

VA Fileman 22.2

Select OPTION: 1  ENTER OR EDIT FILE ENTRIES

Input to what File: DEVICE    (53 entries)
EDIT WHICH FIELD: ALL// <enter>

Select DEVICE NAME: NULL
     1   NULL      NT SYSTEM     NLA:
     2   NULL  GTM-UNIX-NULL    Bit Bucket (GT.M-Unix)     /dev/null
     3   NULL-DSM      Bit Bucket     _NLA0:
CHOOSE 1-3: 1  NULL    NT SYSTEM     NLA:
NAME: NULL// NT-NULL
LOCATION OF TERMINAL: NT SYSTEM// ^

Select DEVICE NAME: NULL
     1   NULL  GTM-UNIX-NULL    Bit Bucket (GT.M-Unix)     /dev/null
     2   NULL-DSM      Bit Bucket     _NLA0:
CHOOSE 1-2: 2  NULL-DSM    Bit Bucket     _NLA0:
NAME: NULL-DSM// DSM-NULL
LOCATION OF TERMINAL: Bit Bucket// ^

Select DEVICE NAME: NULL  GTM-UNIX-NULL    Bit Bucket (GT.M-Unix)    /dev/null

NAME: GTM-UNIX-NULL// NULL
LOCATION OF TERMINAL: Bit Bucket (GT.M-Unix)  Replace <enter>
Select MNEMONIC: NULL// @
   SURE YOU WANT TO DELETE? Y  (Yes)
Select MNEMONIC: GTM-LINUX-NULL// @
   SURE YOU WANT TO DELETE? Y  (Yes)
Select MNEMONIC: <enter>
LOCAL SYNONYM: ^

Select DEVICE NAME: <enter>
At this point, we need to make sure that $I (short for $IO) for the device is correct for the system. All Unices have /dev/null; Windows is //./nul.
Select OPTION: ENTER OR EDIT FILE ENTRIES

Input to what File: DEVICE// <enter>             (54 entries)
EDIT WHICH FIELD: ALL// $I

Select DEVICE NAME: NULL
$I: /dev/null// //./nul (or leave it alone as it is correct for Unix).

Select DEVICE NAME: <enter>
If you use Cache on Windows or Linux; or GT.M/YottaDB, you should be set theoretically. However, the FOIA set-up is incomplete or overspecified. I would prefer to select an entry and make sure it's properly specified:
You need to fill these fields and no others, as follows:
Here's an example:
Select OPTION: ENTER OR EDIT FILE ENTRIES


Input to what File: DEVICE//  <enter>            (54 entries)
EDIT WHICH FIELD: ALL// NAME
THEN EDIT FIELD: $I
THEN EDIT FIELD: LOCATION OF TERMINAL
THEN EDIT FIELD: TYPE
     1   TYPE
     2   TYPE-AHEAD
CHOOSE 1-2: 1  TYPE
THEN EDIT FIELD: SUBTYPE
THEN EDIT FIELD: SIGN-ON/SYSTEM DEVICE
THEN EDIT FIELD: <enter>
STORE THESE FIELDS IN TEMPLATE: <enter>


Select DEVICE NAME: CONSOLE
     1   CONSOLE      CONSOLE     OPA
     2   CONSOLE  GTM-UNIX-CONSOLE    Console (GT.M)     /dev/tty
     3   CONSOLE  CACHE-WINDOWS-CONSOLE    Console (Cache' on Windows)     |TRM|

CHOOSE 1-3: 2  GTM-UNIX-CONSOLE    Console (GT.M)     /dev/tty
NAME: GTM-UNIX-CONSOLE// <enter>
$I: /dev/tty// <enter>
LOCATION OF TERMINAL: Console (GT.M)// <enter>
TYPE: VIRTUAL TERMINAL// <enter>
SUBTYPE: C-VT100// C-VT220      Digital Equipment Corporation VT-220 terminal
SIGN-ON/SYSTEM DEVICE: Y  YES
The FOIA only comes with Linux Virtual Terminal. As before, here's what you need to fill it out.
The HFS device is necessary because KIDS (the installation system used by VISTA) uses it to open files on the operating system. (Technically, it only uses the Open Parameters field.) The one that comes in FOIA looks like this:
NAME: HFS                               $I: USER$:[TEMP]TMP.DAT
ASK DEVICE: YES                       ASK PARAMETERS: YES
LOCATION OF TERMINAL: Host File Server
ASK HOST FILE: YES                    ASK HFS I/O OPERATION: YES
OPEN COUNT: 870                       OPEN PARAMETERS: "WNS"
SUBTYPE: P-OTHER                      TYPE: HOST FILE SERVER
You need to select it and change the settings as follows:
Next, a domain should be set up for the VistA instance. A domain name is typically used to uniquely identify an instance on a network. The parent domain is the domain responsible for routing your traffic to the outside world. The Q-PATCH domain is only necessary for developers wishing to use OSEHRA Forum. First we add the entry to the DOMAIN file through Fileman.
>S DUZ=.5 D Q^DI

VA Fileman 22.0

Select OPTION: 1  ENTER OR EDIT FILE ENTRIES

INPUT TO WHAT FILE: // DOMAIN
                                     (70 entries)
EDIT WHICH FIELD: ALL// ALL

Select DOMAIN NAME: DEMO.OSEHRA.ORG
  Are you adding 'DEMO.OSEHRA.ORG' as a new DOMAIN (the 71ST)? No// Y  (Yes)
FLAGS: ^

Select DOMAIN NAME: Q-PATCH.OSEHRA.ORG
      Are you adding 'Q-PATCH.OSEHRA.ORG' as a new DOMAIN (the 96TH)? No// Y  (Yes)
NAME: Q-PATCH.OSEHRA.ORG// <enter>
FLAGS: Q
SECURITY KEY: <enter>
VALIDATION NUMBER: <enter>
NEW VALIDATION NUMBER: <enter>
DISABLE TURN COMMAND: <enter>
RELAY DOMAIN: <enter>
Select TRANSMISSION SCRIPT: MAIN
  Are you adding 'MAIN' as a new TRANSMISSION SCRIPT (the 1ST for this DOMAIN)?
 No// Y  (Yes)
  PRIORITY: 1
  NUMBER OF ATTEMPTS: 2
  TYPE: Simple  Simple Mail Transfer Protocol
  PHYSICAL LINK / DEVICE: NULL Stored internally as NULL
  NETWORK ADDRESS (MAILMAN HOST): FORUM.OSEHRA.ORG
  OUT OF SERVICE: <enter>
  TEXT:
  (on GT.M/YottaDB)
  1>O H="FORUM.OSEHRA.ORG",P=TCP/GTM
  2>C TCPCHAN-SOCKET25/GTM
  3><enter>
  (on Cache)
  1>O H="FORUM.OSEHRA.ORG",P=TCP/IP-MAILMAN
  2>C TCPCHAN-SOCKET25/CACHE/NT
  3><enter>
EDIT Option: ^
  TRANSMISSION SCRIPT NOTES:
  1><enter>
Select TRANSMISSION SCRIPT: ^

Select DOMAIN NAME: FORUM.OSEHRA.ORG
NAME: FORUM.OSEHRA.ORG// <enter>
      Are you adding 'FORUM.OSEHRA.ORG' as a new DOMAIN (the 97TH)? No// Y  (Yes)
FLAGS: Q
SECURITY KEY: <enter>
VALIDATION NUMBER: <enter>
NEW VALIDATION NUMBER: <enter>
DISABLE TURN COMMAND: <enter>
RELAY DOMAIN: <enter>
Select TRANSMISSION SCRIPT: MAIN
  Are you adding 'MAIN' as a new TRANSMISSION SCRIPT (the 1ST for this DOMAIN)?
 No// Y  (Yes)
  PRIORITY: 1
  NUMBER OF ATTEMPTS: 2
  TYPE: Simple  Simple Mail Transfer Protocol
  PHYSICAL LINK / DEVICE: NULL Stored internally as NULL
  NETWORK ADDRESS (MAILMAN HOST): FORUM.OSEHRA.ORG
  OUT OF SERVICE: <enter>
  TEXT:
  (on GT.M/YottaDB)
  1>O H="FORUM.OSEHRA.ORG",P=TCP/GTM
  2>C TCPCHAN-SOCKET25/GTM
  3><enter>
  (on Cache)
  1>O H="FORUM.OSEHRA.ORG",P=TCP/IP-MAILMAN
  2>C TCPCHAN-SOCKET25/CACHE/NT
  3><enter>

EDIT Option: ^
  TRANSMISSION SCRIPT NOTES:
  1><enter>
Select TRANSMISSION SCRIPT: ^

Select DOMAIN NAME: <enter>

Select OPTION: <enter>
>
The next step is to find the IEN of the instance domain. This can be done by inquiring about the entry using Fileman and printing the Record Number:
>S DUZ=.5 D Q^DI

VA Fileman 22.2

Select OPTION: 5  INQUIRE TO FILE ENTRIES

OUTPUT FROM WHAT FILE: DOMAIN// DOMAIN   (71 entries)
Select DOMAIN NAME: DEMO.OSEHRA.ORG
ANOTHER ONE: <enter>
STANDARD CAPTIONED OUTPUT? Yes// Y  (Yes)
Include COMPUTED fields:  (N/Y/R/B): NO// Record Number (IEN)

NUMBER: 76                              NAME: DEMO.OSEHRA.ORG

Select DOMAIN NAME: <enter>

Select OPTION: <enter>
>
Then we propagate that entry to the Kernel System Parameters and RPC Broker Site Parameters files. The value that is being set should be the same as the NUMBER value from the above result.
>S $P(^XWB(8994.1,1,0),"^")=76
>S $P(^XTV(8989.3,1,0),"^")=76
Re-index the files after making this change.
>F DIK="^XTV(8989.3,","^XWB(8994.1," S DA=1 D IXALL2^DIK,IXALL^DIK
System is christened using menu option XMCHIRS with FORUM.OSEHRA.ORG as the parent.
>S DUZ=.5 D ^XUP

Setting up programmer environment
This is a TEST account.

Terminal Type set to: C-VT320

Select OPTION NAME: XMCHRIS       Christen a domain
Christen a domain

         * * * *  WARNING  * * * *

You are about to change the domain name of this facility
in the Mailman Site Parameters file.

Currently, this facility is named: FOIA.DOMAIN.EXT

You must be extremely sure before you proceed!

Are you sure you want to change the name of this facility? NO// YES
Select DOMAIN NAME: FOIA.DOMAIN.EXT// DEMO.OSEHRA.ORG

The domain name for this facility is now: DEMO.OSEHRA.ORG

PARENT: DOMAIN.EXT// FORUM.OSEHRA.ORG
TIME ZONE: EST// PST       PACIFIC STANDARD

FORUM.OSEHRA.ORG has been initialized as your 'parent' domain.
(Forum is usually the parent domain, unless this is a subordinate domain.)

You may edit the Mailman Site Parameter file to change your parent domain.

We will not initialize your transmission scripts.

Use the 'Subroutine editor' option under network management menu to add your
site passwords to the MINIENGINE script, and the 'Edit a script' option
to edit any domain scripts that you choose to.
>
Taskman is the VistA subsystem that is responsible for running processes in the background.
The first step is to find the box volume pair for the local machine.
>D GETENV^%ZOSV W Y
which will print out a message with four parts separated by ^ that could look something like (Cache):
VISTA^VISTA^palaven^VISTA:CACHE
or (GT.M/YottaDB)
VAH^ROU^Macintosh^ROU:Macintosh
The four pieces of the string are:
UCI^VOL^NODE^VOLUME:BOX
The fourth piece, the VOLUME:BOX pair, is referred to as the "BOX VOLUME pair". The first component of the Box Volume pair is the Volume Set, which is used to define the location of routines for the VistA system. The second component, Box, references the system where the instance is found. In a Caché system, it would be the name of the Caché instance; while on GT.M/YottaDB, it should reference the hostname of the machine.
The Volume Set result needs to be altered in the VOLUME SET file, and we will reuse some setup by writing over the name of the first entry that is already in the VistA system. The first entry, the entry with an IEN of 1, can be selected by entering `1.
Then we rename the first Box-Volume pair in the Taskman Site Parameters file to match what was found above.
For this demonstration instance, the Volume Set will be ROU, as per the output above.
>D Q^DI

VA Fileman 22.2

Select OPTION: 1  ENTER OR EDIT FILE ENTRIES

Input to what File: RPC BROKER SITE PARAMETERS// 14.5  VOLUME SET
                                          (1 entry)
EDIT WHICH FIELD: ALL// <enter>

Select VOLUME SET: `1
VOLUME SET: ROU// <enter>
TYPE: GENERAL PURPOSE VOLUME SET// <enter>
INHIBIT LOGONS?: NO// <enter>
LINK ACCESS?: NO// <enter>
OUT OF SERVICE?: NO// <enter>
REQUIRED VOLUME SET?: NO// <enter>
TASKMAN FILES UCI: VAH// <enter>
TASKMAN FILES VOLUME SET: ROU// <enter>
REROUCEMENT VOLUME SET: <enter>
DAYS TO KEEP OLD TASKS: 4// 14
SIGNON/PRODUCTION VOLUME SET: Yes// <enter>
RE-QUEUES BEFORE UN-SCHEDULE: 12// <enter>

Select VOLUME SET: <enter>
The next step sets the Taskman parameters:
Select OPTION: 1  ENTER OR EDIT FILE ENTRIES

Input to what File: UCI ASSOCIATION// 14.7  TASKMAN SITE PARAMETERS
                                          (1 entry)
EDIT WHICH FIELD: ALL// <enter>

Select TASKMAN SITE PARAMETERS BOX-VOLUME PAIR: `1
BOX-VOLUME PAIR: PLA:PLAISCSVR// ?  ; Type a ? to see what is the correct value you should enter.
     Answer must be 3-30 characters in length.

     The value for the current account is ROU:Macintosh
BOX-VOLUME PAIR: PLA:PLAISCSVR// ROU:Macintosh ; Enter that value.
RESERVED: <enter>
LOG TASKS?: NO// @
   SURE YOU WANT TO DELETE? y  (Yes)
DEFAULT TASK PRIORITY: <enter>
TASK PARTITION SIZE: <enter>
SUBMANAGER RETENTION TIME: 0// <enter>
TASKMAN JOB LIMIT: 100// 24 ; Must be 80% of maximum; in our case that's 30.
TASKMAN HANG BETWEEN NEW JOBS: 1// 0 ; No need to throttle process creation.
MODE OF TASKMAN: GENERAL PROCESSOR// <enter>
VAX ENVIROMENT FOR DCL: <enter>
OUT OF SERVICE: NO// <enter>
MIN SUBMANAGER CNT: 5// 1 ; Change that to 1
TM MASTER: <enter>
Balance Interval: <enter>
LOAD BALANCE ROUTINE: <enter>
Auto Delete Tasks: Y  Yes ; Delete Tasks automatically
Manager Startup Delay: 1 ; Don't wait to start the Manager when first starting.

Select TASKMAN SITE PARAMETERS BOX-VOLUME PAIR: <enter>
We are not done with setting Taskman up yet; but we need to fix the Volume multiple and several other items our in the Kernel System Parameters file first:
>D Q^DI

VA Fileman 22.2

Select OPTION: 1  ENTER OR EDIT FILE ENTRIES

Input to what File: UCI ASSOCIATION// KERNEL SYSTEM PARAMETERS
                                          (1 entry)
EDIT FIELD: AGENCY CODE
THEN EDIT FIELD: VOLUME SET    (multiple)
   EDIT WHICH VOLUME SET SUB-FIELD: ALL//<enter>
THEN EDIT FIELD: DNS IP
THEN EDIT FIELD: DEFAULT AU
     1   DEFAULT AUTO SIGN-ON
     2   DEFAULT AUTO-MENU
CHOOSE 1-2: 2  DEFAULT AUTO-MENU
THEN EDIT FIELD: INTRO MESSAGE    (word-processing)
THEN EDIT FIELD: PRIMARY HFS DIRECTORY
THEN EDIT FIELD: <enter>

Select KERNEL SYSTEM PARAMETERS DOMAIN NAME: `1 DEMO.OSEHRA.ORG
         ...OK? Yes// <enter>  (Yes)

AGENCY CODE: VA// E  EHR
Select VOLUME SET: PLA// @
   SURE YOU WANT TO DELETE THE ENTIRE 'PLA' VOLUME SET? Y  (Yes)
Select VOLUME SET: ROU
  Are you adding 'ROU' as a new VOLUME SET? No// Y  (Yes)
  MAX SIGNON ALLOWED: 30
  LOG SYSTEM RT?:<enter>
Select VOLUME SET:
DNS IP: 127.0.0.1,127.0.0.12  Replace ... With 8.8.8.8
  Replace
   8.8.8.8
DEFAULT AUTO-MENU: NO// Y  YES
INTRO MESSAGE:
  1>NEW SYSTEM 304-262-7078
EDIT Option: 1
  1>NEW SYSTEM 304-262-7078
  Replace ... With This is my test system.  Replace
   This is my test system.
Edit line: <enter>
EDIT Option: <enter>
PRIMARY HFS DIRECTORY: /tmp/// <enter>


Select KERNEL SYSTEM PARAMETERS DOMAIN NAME:
At this point, we are ready to go back to getting Taskman to run. We will now run ^ZTMCHK which checks our work and makes sure we didn't screw up royally.
>D ^ZTMCHK
Checking Task Manager's Environment.

Checking Taskman's globals...
     ^%ZTSCH is defined!
     ^%ZTSK is defined!
     ^%ZTSK(-1) is defined!
     ^%ZIS(14.5,0) is defined!
     ^%ZIS(14.6,0) is defined!
     ^%ZIS(14.7,0) is defined!

Checking the ^%ZOSF nodes required by Taskman...
     All ^%ZOSF nodes required by Taskman are defined!

Checking the links to the required volume sets...
     There are no volume sets whose links are required!

Checks completed...Taskman's environment is okay!

Press RETURN to continue or '^' to exit:

Here is the information that Taskman is using:
     Operating System:  GT.M (Unix)
     Volume Set:  ROU
     Cpu-volume Pair:  ROU:Macintosh
     Taskman Files UCI and Volume Set:  VAH,ROU

     Log Tasks?
     Submanager Retention Time: 0
     Min Submanager Count: 1
     Taskman Hang Between New Jobs: 0
     Taskman running as a type: GENERAL

     Logons Inhibited?:  N
     Taskman Job Limit:  24
     Max sign-ons: 30
     Current number of active jobs: 1

End of listing.  Press RETURN to continue:
If ANY of the fields in the last screen are empty, except "Log Tasks?", you made a mistake. Double check your work.
Next we need to initialize the recurring and start-up tasks that VistA will run. The set of tasks you want your system to run with is very variable; you can see this page for guidance: http://www.vistapedia.com/index.php/Taskman_Recurring_Tasks. We will set these base tasks, which every VistA system ought to have, up on your VistA system:
Start-up Jobs:
Nightly Jobs:
Beyond these tasks, which tasks you run depends on what's important to you: if you write notes, you will want TIU tasks; if you use Drug Accountability, you will want PSA tasks; etc.
FOIA VistA comes with a lot of junk, so I advise starting from a clean slate. Be careful with the next few commands: they should never be run on an existing system, otherwise they may delete patient data:
>K ^%ZTSK,^%ZTSCH ; clean taskman Globals
>D DT^DICRW S DIK="^DIC(19.2," F DA=0:0 S DA=$O(^DIC(19.2,DA)) Q:'DA  D ^DIK ; Delete all tasks
Next add the tasks outlined above to OPTION SCHEDULING (#19.2). The startup entries will only need the NAME and SPECIAL QUEUING fields; the nightly jobs will need NAME, QUEUED TO RUN AT WHAT TIME, and RESCHEDULING FREQUENCY fields.
>S DUZ=.5 D Q^DI
Select OPTION:    ENTER OR EDIT FILE ENTRIES

Input to what File: KERNEL SYSTEM PARAMETERS// OPTION SCHEDULING (0 entries)
EDIT WHICH FIELD: ALL// .01  NAME
THEN EDIT FIELD: 2  QUEUED TO RUN AT WHAT TIME
THEN EDIT FIELD: 6  RESCHEDULING FREQUENCY
THEN EDIT FIELD: 9  SPECIAL QUEUEING
THEN EDIT FIELD: <enter>

Select OPTION SCHEDULING NAME: XWB LISTENER STARTER       Start All RPC Broker Listeners
  Are you adding 'XWB LISTENER STARTER' as
    a new OPTION SCHEDULING (the 1ST)? No// Y  (Yes)
QUEUED TO RUN AT WHAT TIME: <enter>
RESCHEDULING FREQUENCY: <enter>
SPECIAL QUEUEING: S  STARTUP


Select OPTION SCHEDULING NAME: XOBV LISTENER STARTUP       Start VistaLink Listener Configuration
  Are you adding 'XOBV LISTENER STARTUP' as
    a new OPTION SCHEDULING (the 2ND)? No// Y  (Yes)
QUEUED TO RUN AT WHAT TIME: <enter>
RESCHEDULING FREQUENCY: <enter>
SPECIAL QUEUEING: S  STARTUP


Select OPTION SCHEDULING NAME: XUSER-CLEAR-ALL       Clear all users at startup
  Are you adding 'XUSER-CLEAR-ALL' as
    a new OPTION SCHEDULING (the 3RD)? No// Y  (Yes)
QUEUED TO RUN AT WHAT TIME: <enter>
RESCHEDULING FREQUENCY: <enter>
SPECIAL QUEUEING: S  STARTUP


Select OPTION SCHEDULING NAME: XUDEV RES-CLEAR
  Are you adding 'XUDEV RES-CLEAR' as
    a new OPTION SCHEDULING (the 4TH)? No// Y  (Yes)
QUEUED TO RUN AT WHAT TIME: <enter>
RESCHEDULING FREQUENCY: <enter>
SPECIAL QUEUEING: S  STARTUP


Select OPTION SCHEDULING NAME: XMMGR-START-BACKGROUND-FILER       START background filer
  Are you adding 'XMMGR-START-BACKGROUND-FILER' as
    a new OPTION SCHEDULING (the 5TH)? No// Y  (Yes)
QUEUED TO RUN AT WHAT TIME: <enter>
RESCHEDULING FREQUENCY: <enter>
SPECIAL QUEUEING: S  STARTUP

Select OPTION SCHEDULING NAME:    XMAUTOPURGE
  Are you adding 'XMAUTOPURGE' as
    a new OPTION SCHEDULING (the 6TH)? No// Y  (Yes)
QUEUED TO RUN AT WHAT TIME: T+1@0001  (DEC 01, 2016@00:01)
RESCHEDULING FREQUENCY: 1D
SPECIAL QUEUEING: <enter>


Select OPTION SCHEDULING NAME: XMCLEAN       Clean out waste baskets
  Are you adding 'XMCLEAN' as a new OPTION SCHEDULING (the 7TH)? No// Y  (Yes)
QUEUED TO RUN AT WHAT TIME: T+1@0005  (DEC 01, 2016@00:05)
RESCHEDULING FREQUENCY: 1D
SPECIAL QUEUEING: <enter>


Select OPTION SCHEDULING NAME: XMMGR-PURGE-AI-XREF      AI x-Ref Purge of Received Network Messages
  Are you adding 'XMMGR-PURGE-AI-XREF' as
    a new OPTION SCHEDULING (the 8TH)? No// Y  (Yes)
QUEUED TO RUN AT WHAT TIME: T+1@0010  (DEC 01, 2016@00:10)
RESCHEDULING FREQUENCY: 1D
SPECIAL QUEUEING: <enter>


Select OPTION SCHEDULING NAME: XQBUILDTREEQUE       Non-interactive Build Primary Menu Trees
  Are you adding 'XQBUILDTREEQUE' as a new OPTION SCHEDULING (the 9TH)? No// Y
  (Yes)
QUEUED TO RUN AT WHAT TIME: T+1@0015  (DEC 01, 2016@00:15)
RESCHEDULING FREQUENCY: 1D
SPECIAL QUEUEING: <enter>


Select OPTION SCHEDULING NAME: XQ XUTL $J NODES       Clean old Job Nodes in XUTL
  Are you adding 'XQ XUTL $J NODES' as
    a new OPTION SCHEDULING (the 10TH)? No// Y  (Yes)
QUEUED TO RUN AT WHAT TIME: T+1@0020  (DEC 01, 2016@00:20)
RESCHEDULING FREQUENCY: 1D
SPECIAL QUEUEING: <enter>


Select OPTION SCHEDULING NAME: XUERTRP AUTO CLEAN       Error trap Auto clean
  Are you adding 'XUERTRP AUTO CLEAN' as
    a new OPTION SCHEDULING (the 11TH)? No// Y  (Yes)
QUEUED TO RUN AT WHAT TIME: T+1@0025  (DEC 01, 2016@00:25)
RESCHEDULING FREQUENCY: 1D
SPECIAL QUEUEING: <enter>


Select OPTION SCHEDULING NAME: XUTM QCLEAN       Queuable Task Log Cleanup
  Are you adding 'XUTM QCLEAN' as a new OPTION SCHEDULING (the 12TH)? No// Y
  (Yes)
QUEUED TO RUN AT WHAT TIME: T+1@0030  (DEC 01, 2016@00:30)
RESCHEDULING FREQUENCY: 1D
SPECIAL QUEUEING: <enter>
There are actually just two more steps:
DO ^ZTMB to start Taskman. NOTE THAT IS THIS THE ONLY WAY TO START TASKMAN! Restarting Taskman means that data control structure from the old system will be assumed to be correct. Don't do it!DO ^ZTMON to confirm that everything is running.You should see this (press enter several times to update the screen, it should take at least 1 second to start); to exit, type ^.
>D ^ZTMB,^ZTMON

Checking Taskman.   Current $H=64252,53277  (Nov 30, 2016@14:47:57)
                      RUN NODE=64252,53274  (Nov 30, 2016@14:47:54)
Taskman is current..
Checking the Status List:
  Node        weight  status      time       $J
 ROU:Macintosh        RUN      T@14:47:54   81569     Main Loop

Checking the Schedule List:
     Taskman has 3 tasks scheduled.
     None of them are overdue.

Checking the IO Lists:  Last TM scan: 2 sec,
     There are no tasks waiting for devices.

Checking the Job List:
     There are no tasks waiting for partitions.

Checking the Task List:
     There are no tasks currently running.
Checking Sub-Managers:
     On node ROU:Macintosh there is  1 free Sub-Manager(s). Status: Run
On CACHE, you can run D THIS^%SS to find out what started; on GT.M/YottaDB, you should have a ZSY which does the same thing. If ZSY isn't present on your instance, you can do something similar to the following until you find a ZSY:
Cache:
>D THIS^%SS

                   Cache System Status:  3:16 pm 30 Nov 2016
 Process  Device      Namespace      Routine         CPU,Glob  Pr User/Location
   72316* /dev/ttys004FOIA1611       shell       3506713,3993500  UnknownUser
   85180  /dev/null   FOIA1611       %ZTM          11266,1562  0  UnknownUser
   85393  /dev/null   FOIA1611       %ZTMS1         5177,203   0  UnknownUser
   85404  /dev/null   FOIA1611       %ZTMS1         5177,203   0  UnknownUser
   85218  /dev/null   FOIA1611       %ZTMS1         5288,214   0  UnknownUser
   85230  /dev/null   FOIA1611       %ZTMS1         5287,214   0  UnknownUser
   85242  /dev/null   FOIA1611       %ZTMS1         5287,214   0  UnknownUser
   85254  /dev/null   FOIA1611       %ZTMS1         5287,214   0  UnknownUser
   85266  /dev/null   FOIA1611       %ZTMS1         5287,214   0  UnknownUser
   85269  /dev/null   FOIA1611       %ZTMS1         5287,214   0  UnknownUser
   85295  /dev/null   FOIA1611       %ZTMS1         5287,214   0  UnknownUser
   85398  /dev/null   FOIA1611       %ZTMS1         5177,203   0  UnknownUser
   85409  /dev/null   FOIA1611       %ZTMS1         5177,203   0  UnknownUser
   85414  /dev/null   FOIA1611       %ZTMS1         5063,187   0  UnknownUser
   85342  /dev/null   FOIA1611       %ZTMS1         5287,214   0  UnknownUser
   85348  /dev/null   FOIA1611       %ZTMS1         5287,214   0  UnknownUser
   85354  /dev/null   FOIA1611       %ZTMS1         5177,203   0  UnknownUser
   85359  /dev/null   FOIA1611       %ZTMS1         5177,203   0  UnknownUser
   85419  /dev/null   FOIA1611       %ZTMS1         5063,187   0  UnknownUser
   85424  /dev/null   FOIA1611       %ZTMS1         5063,187   0  UnknownUser
   85430  /dev/null   FOIA1611       %ZTMS1         5063,187   0  UnknownUser
   85435  /dev/null   FOIA1611       %ZTMS1         5063,187   0  UnknownUser
   85441  /dev/null   FOIA1611       %ZTMS1         5063,187   0  UnknownUser
GT.M/YottaDB:
DO ^ZSY.
Proc. id Proc. name      PS  Device   Routine            MODE     CPU time
-------- --------------- --- -------- --------           -------
8757     Sub 8757        hib          GETTASK+3^%ZTMS1   -direct  00:00:00
                             0 OPEN RMS STREAM NOWRAP :
                             0-out OPEN RMS STREAM NOWRAP :
8771                     S+  pts/1    JOBSET+9^ZSY       -dir     00:00:00
                             /dev/pts/1 OPEN TERMINAL CTRA=$C(3) NOPAST NOESCA
                             ps OPEN PIPE SHELL="/bin/sh" COMMAND="ps eo pid,tt
28250    Taskman ROU 1   hib          IDLE+3^%ZTM        -direct  00:55:38
                             0 OPEN RMS STREAM NOWRAP :
                             0-out OPEN RMS STREAM NOWRAP :
28311    BTask 619367    hib          GO+12^XMTDT        -direct  00:06:54
                             0 OPEN RMS STREAM NOWRAP :
                             0-out OPEN RMS STREAM NOWRAP :
29662    BTask 619368    hib          GO+26^XMKPLQ       -direct  00:06:39
                             0 OPEN RMS STREAM NOWRAP :
                             0-out OPEN RMS STREAM NOWRAP :

Total 5 users.
If you don't have ^ZSY on GT.M/YottaDB, try this: it does what ZSY does:
>K ^XUTL("XUSYS")
>zsy "kill -SIGUSR1 $(lsof -t ${vista_home}/g/mumps.dat)"

>zwrite ^XUTL("XUSYS",:,"JE","INTERRUPT")
^XUTL("XUSYS",1565,"JE","INTERRUPT")="IDLE+3^%ZTM"
^XUTL("XUSYS",2236,"JE","INTERRUPT")="GO+26^XMKPLQ"
^XUTL("XUSYS",2667,"JE","INTERRUPT")="GO+12^XMTDT"
^XUTL("XUSYS",9259,"JE","INTERRUPT")="+1^GTM$DMOD"
^XUTL("XUSYS",18658,"JE","INTERRUPT")="GETTASK+3^%ZTMS1"
VistA has a very complex structure to deal with the question of: in what hospital are you signed in right now? The answer determines the value of the all important variable DUZ(2) and the API SITE^VASITE().
There are five files that are important in that regard: INSTITUTION (#4), STATION NUMBER (TIME SENSITIVE) (#389.9), KERNEL SYSTEM PARAMETERS (#8989.3), MEDICAL CENTER DIVISION file (#40.8), and MASTER PATIENT INDEX (LOCAL NUMBERS) (984.1). We will add our Hospital to the INSTITUTION file first, with the station number 999. Then we will make sure that the STATION NUMBER file says 999; and then will will point the KERNEL SYSTEM PARAMETERS and MEDICAL CENTER DIVISION to our new Hospital. In MASTER PATIENT INDEX, we tell it our station number and the range of numbers for our Integration Control Numbers (ICNs), the number used to identify patients across systems.
By default, FOIA VistA comes with station number 050, and the institution is called SOFTWARE SERVICE. We can't leave that alone because VistA malfunctions with station numbers are are just 2 digits long (050 becomes 50 in code).
The INSITUTION file is protected from editing by requiring the variable XUMF to be defined. That tells us that inside of the VA, the file is updated by something called Standard Terminology Services (STS), which works by sending VistA mail messages of what to update, and VistA creates the entry based on that mail message. Normally when you see that, you should stay the hell out of the file: it's standardized and should not be tampered with. However, people outside of the VA have no other way to run VistA without updating this file.
We enter Fileman after setting the XUMF variable. Note that in the US, we are supposed to fill the NPI variable, and Fileman won't let me go further without filling it; but I was able to jump forward to avoid answering it. Also, note that we have to fill the STATION NUMBER entry twice, once in the field named so, and another time in the coding system multiple.
A quick note on FACILITY TYPE: This field is important to idenfity your institution as a Medical facility; if you don't do that, while things mostly work, there will be a few odd items that won't work, like the API to add a patient in ADD^VAFCPTAD.
>S DUZ=.5,XUMF=1 D Q^DI


VA Fileman 22.2


Select OPTION: ENTER OR EDIT FILE ENTRIES


Input to what File: OPTION SCHEDULING// 4  INSTITUTION
                                          (2535 entries)

EDIT WHICH FIELD: ALL// NAME
THEN EDIT FIELD: STATE
     1   STATE
     2   STATE (MAILING)
CHOOSE 1-2: 1  STATE
THEN EDIT FIELD: SHORT NAME
THEN EDIT FIELD: .06  VA TYPE CODE
THEN EDIT FIELD: 1.01  STREET ADDR. 1
THEN EDIT FIELD: 1.02  STREET ADDR. 2
THEN EDIT FIELD: 1.03  CITY
THEN EDIT FIELD: 1.04  ZIP
THEN EDIT FIELD: 5  MULTI-DIVISION FACILITY
THEN EDIT FIELD: 11  STATUS
THEN EDIT FIELD: 13  FACILITY TYPE
THEN EDIT FIELD: 41.99  NPI
THEN EDIT FIELD: 52  FACILITY DEA NUMBER
THEN EDIT FIELD: 52.1  FACILITY DEA EXPIRATION DATE
THEN EDIT FIELD: 60  DOMAIN
THEN EDIT FIELD: 95  AGENCY CODE
THEN EDIT FIELD: 99  STATION NUMBER
THEN EDIT FIELD: 9999  IDENTIFIER  (multiple)
   EDIT WHICH IDENTIFIER SUB-FIELD: ALL// <enter>
THEN EDIT FIELD:<enter>
STORE THESE FIELDS IN TEMPLATE:<enter>

Select INSTITUTION NAME: PALM DESERT HOSPITAL
  Are you adding 'PALM DESERT HOSPITAL' as a new INSTITUTION (the 2536TH)? No// Y
  (Yes)
STATE: CA
     1   CALIFORNIA
     2   CANADA
CHOOSE 1-2: 1  CALIFORNIA
SHORT NAME: PDH??
     ANSWER MUST BE 4-80 CHARACTERS IN LENGTH
SHORT NAME: PALDH
VA TYPE CODE: MC  HOSP
STREET ADDR. 1: 111 ANY LANE
STREET ADDR. 2: <enter>
CITY: PALM DESERT
ZIP: 92211
MULTI-DIVISION FACILITY: N  NO
STATUS: N  National
FACILITY TYPE: ??
 The type of facility. A replacement for the type field.


 Choose from:
 AIR FORCE        AIR FORCE
 ARMY        ARMY
 BVA/VBA-SO        BOARD OF VETERANS APPEALS/VBA SUPPORT OFFICE
 CBOC        COMMUNITY BASED OUTPATIENT CLINIC
 CEC        CONTINUING EDUCATION CENTER
 CHEP        COOPERATIVE HEALTH EDUCATION PROGRAM
 CIVH        CIVILIAN HOSPITAL
 CLC        VA COMMUNITY LIVING CENTER
 CMOP        CONSOLIDATED MAIL OUTPATIENT PHARMACY
 CO        CENTRAL OFFICE
 CZGH        CANAL ZONE GENERAL HOSPITAL
 D        DOMICILIARY
 DDC        DENVER DISTRIBUTION CENTER
 DEC        DENTAL EDUCATION CENTER
 DENT        DENTAL CLINIC
 DOD        DEPARTMENT OF DEFENSE
 DOM        DOMICILIARY
 DPC        VA DATA PROCESSING CENTER
 EES        EMPLOYEE EDUCATION SYSTEMS
 ETC        ENGINEERING TRAINING CENTER
 FC        FINANCE CENTER
 GC        GENERAL COUNSEL
 HCS        HEALTH CARE SYSTEM
 IHS        INDIAN HEALTH SERVICE
 ISC        INFORMATION SYSTEMS CENTER
 M&ROC        MEDICAL AND REGIONAL OFFFICE CENTER
 M&ROC(M&RO)        MEDICAL AND REGIONAL OFFFICE CENTER
 MC(M&D)        MEDICAL CENTER (MEDICAL AND DOMICILIARY)
 MC(M)        MEDICAL CENTER (MEDICAL LOCATION)
 MD        MEDICAL DISTRICT
 MKC        MARKETING CENTER
 MORC        MOBILE OUTREACH CLINIC
 MPI        MASTER PATIENT INDEX
 MSN        MEMORIAL SERVICE NETWORK
 NAVY        NAVY
 NCAO        NATIONAL CEMETERY AREA OFFICE
 NCSO        NATIONAL CEMETERY STATION OFFICE
 NHC        NURSING HOME CARE
 OC        OUTPATIENT CLINIC (INDEPENDENT)
 OCMC        OUTPATIENT CLINIC (SUBORDINATE)
 OCS        OUTPATIENT CLINIC SUBSTATION
                                          ^
      You may enter a new FACILITY TYPE, if you wish
      Answer must be 1-11 characters in length.

FACILITY TYPE: VAMC VA MEDICAL CENTER
NPI: <enter>??
     Answer must be 10 characters in length and not being used.
NPI: <enter>?
     Answer must be 10 characters in length and not being used.
NPI: ^FACIL
     1   FACILITY DEA EXPIRATION DATE
     2   FACILITY DEA NUMBER
     3   FACILITY TYPE
CHOOSE 1-3: 2  FACILITY DEA NUMBER
FACILITY DEA NUMBER: <enter>
FACILITY DEA EXPIRATION DATE: <enter>
DOMAIN: DEMO.OSEHRA.ORG
AGENCY CODE: E  EHR
STATION NUMBER: 999
Select CODING SYSTEM: VASTANUM
   CODING SYSTEM ID: 999
  ID: 999// <enter>
  EFFECTIVE DATE/TIME: N  (DEC 03, 2016)
  STATUS: ?
     Choose from:
       1        ACTIVE
       0        INACTIVE
  STATUS: 1  ACTIVE


Select INSTITUTION NAME: <enter>
Next, we will tackle the STATION NUMBER file. We technically can create an new entry, but I would just rather reuse the existing entry, which I do by typing `1.
Select OPTION: ENTER OR EDIT FILE ENTRIES


Input to what File: INSTITUTION// STATION NUMBER (TIME SENSITIVE)
                                          (1 entry)
EDIT WHICH FIELD: ALL// <enter>


Select STATION NUMBER (TIME SENSITIVE) REFERENCE NUMBER: ?
    Answer with STATION NUMBER (TIME SENSITIVE), or REFERENCE NUMBER, or
        EFFECTIVE DATE, or MEDICAL CENTER DIVISION:
   50        01-01-82     DBA     050

        You may enter a new STATION NUMBER (TIME SENSITIVE), if you wish
        Type a Number between 1 and 9999, 0 Decimal Digits

Select STATION NUMBER (TIME SENSITIVE) REFERENCE NUMBER: `1  50     01-01-82
 DBA     050
REFERENCE NUMBER: 50// 999
EFFECTIVE DATE: JAN 1,1982// <enter>
MEDICAL CENTER DIVISION: DBA// ?
    Answer with MEDICAL CENTER DIVISION NUM, or NAME, or FACILITY NUMBER, or
        TREATING SPECIALTY:
   1            DBA     050

MEDICAL CENTER DIVISION: DBA// <enter>
STATION NUMBER: 050// 999
IS PRIMARY DIVISION: YES// <enter>
INACTIVE: <enter>
OTHER INSTITUTION: <enter>
INTEGRATION NAME: <enter>

Select STATION NUMBER (TIME SENSITIVE) REFERENCE NUMBER: <enter>
Next, the KERNEL SYSTEM PARAMETERS file:
Select OPTION: ENTER OR EDIT FILE ENTRIES


Input to what File: STATION NUMBER (TIME SENSITIVE)// KERNEL SYSTEM PARAMETERS
                                          (1 entry)
EDIT WHICH FIELD: ALL// DEFAULT INSTITUTION
THEN EDIT FIELD: <enter>


Select KERNEL SYSTEM PARAMETERS DOMAIN NAME: `1  DEMO.OSEHRA.ORG
DEFAULT INSTITUTION: SOFTWARE SERVICE// PALM DES
     1   PALM DESERT CBOC      CA  CBOC      605GC
     2   PALM DESERT HOSPITAL    CA          999
CHOOSE 1-2: 2  PALM DESERT HOSPITAL  CA      999


Select KERNEL SYSTEM PARAMETERS DOMAIN NAME: <enter>
Next, the MEDICAL CENTER DIVISION file:
Select OPTION: ENTER OR EDIT FILE ENTRIES

Input to what File: KERNEL SYSTEM PARAMETERS// MEDICAL CENTER DIVISION
                                          (1 entry)

EDIT WHICH FIELD: ALL// .01  NAME
THEN EDIT FIELD: .07  INSTITUTION FILE POINTER
THEN EDIT FIELD: 1  FACILITY NUMBER


Select MEDICAL CENTER DIVISION NAME: `1  DBA     050
NAME: DBA// MAIN CAMPUS
INSTITUTION FILE POINTER: SOFTWARE SERVICE// PALM DESERT HOSPITAL    CA    999
FACILITY NUMBER: 050// 999


Select MEDICAL CENTER DIVISION NAME:<enter>
Next, the MASTER PATIENT INDEX file:
Select OPTION: ENTER OR EDIT FILE ENTRIES

INPUT TO WHAT FILE: MASTER PATIENT INDEX (LOCAL NUMBERS)// MASTER PATIENT INDEX

EDIT WHICH FIELD: ALL//

Select MASTER PATIENT INDEX (LOCAL NUMBERS) SITE ID NUMBER: `1  740
SITE ID NUMBER: 740// 999
LAST NUMBER USED: 500000000// 9990000000
CHECK SUM FOR LAST NUMBER USED: 217407// @
SURE YOU WANT TO DELETE? Y  (Yes)
NEXT NUMBER TO USE: 500000001// 9990000001
CHECK SUM FOR NEXT: 075322// @
SURE YOU WANT TO DELETE? Y  (Yes)


Select MASTER PATIENT INDEX (LOCAL NUMBERS) SITE ID NUMBER:<enter>
At this point, we are ready to check our work. First, we need to know the internal entry number (IEN) of the institution we just created:
Select OPTION: INQUIRE TO FILE ENTRIES


Output from what File: MEDICAL CENTER DIVISION// 4  INSTITUTION
                                          (2536 entries)
Select INSTITUTION NAME: <spacebar><enter>   PALM DESERT HOSPITAL  CA    999
Another one: <enter>
Standard Captioned Output? Yes// N  (No)
First Print FIELD: NUMBER
Then Print FIELD: <enter>
Heading (S/C): INSTITUTION List// <enter>
INSTITUTION List                                     DEC 03, 2016@20:33   PAGE 1
NUMBER
--------------------------------------------------------------------------------

2957
Okay, let's kill our symbol table (the table that keeps our current variables), log-in, and then run $$SITE^VASITE.
>K  S DUZ=.5 D ^XUP

Setting up programmer environment
This is a TEST account.

Terminal Type set to: C-VT100

Select OPTION NAME: <enter>
>W DUZ(2)
2957
>W $$SITE^VASITE()
2957^PALM DESERT HOSPITAL^999
As you can see, our DUZ(2) matches our site number, and $$SITE^VASITE() gives us the correct site number and station number.
Next, we set-up a port for CPRS to connect. CPRS connects to the Remote Procedure Calls Broker, and it connects using Remote Procedures. The next step is to edit entries in the RPC Broker Site Parameters file. The RPC Broker steps will set up information that references both the Port that the listener will listen on and the Box Volume pair of the instance.
>S DUZ=.5 D Q^DI

VA Fileman 22.0

Select OPTION: 1  ENTER OR EDIT FILE ENTRIES

INPUT TO WHAT FILE: VOLUME SET// 8994.1  RPC BROKER SITE PARAMETERS
                                         (1 entry)
EDIT WHICH FIELD: ALL// LISTENER    (multiple)
    EDIT WHICH LISTENER SUB-FIELD: ALL// <enter>
THEN EDIT FIELD: <enter>

Select RPC BROKER SITE PARAMETERS DOMAIN NAME: DEMO.OSEHRA.ORG
        ...OK? Yes// Y   (Yes)

Select BOX-VOLUME PAIR: VISTA:CACHE// <enter>
  BOX-VOLUME PAIR: VISTA:CACHE//
  Select PORT: 9000
  Are you adding '9000' as a new PORT (the 1ST for this LISTENER)? No// Y  (Yes)
    TYPE OF LISTENER: 1  New Style
  STATUS: STOPPED//
  CONTROLLED BY LISTENER STARTER: Y  YES


Select RPC BROKER SITE PARAMETERS DOMAIN NAME: <enter>
Now, start the listener:
>D ^XUP

Setting up programmer environment
This is a TEST account.

Terminal Type set to: C-VT100

Select OPTION NAME: XWB LISTEN
     1   XWB LISTENER EDIT       RPC Listener Edit
     2   XWB LISTENER STARTER       Start All RPC Broker Listeners
     3   XWB LISTENER STOP ALL       Stop All RPC Broker Listeners
CHOOSE 1-3: 2  XWB LISTENER STARTER     Start All RPC Broker Listeners
Start All RPC Broker Listeners
          Task: RPC Broker Listener START on VAH-ROU:Macintosh, port 9000
          has been queued as task 32372
Finally, we need to check that the broker started. While you may use ^%SS or ^ZSY to find that out, I prefer OS level tools that show me that the port is active.
On Mac or Linux, you can run lsof -iTCP -sTCP:LISTEN -P; on Linux, netstat -tnlp; on Windows (including Cygwin), netstat -aon | find /i "listening". Here's an example output on a Mac:
$ lsof -iTCP -sTCP:LISTEN -P
COMMAND   PID USER   FD   TYPE             DEVICE SIZE/OFF NODE NAME
mumps   85939  sam    6u  IPv6 0x5ee953ac0e7fceab      0t0  TCP \*:9000 (LISTEN)
If you shut down your system and then bring it back up, starting Taskman using ^ZTMB will start your broker, as we set it up as one of the startup tasks.
Back to business: To check that the RPC Broker is REALLY working, run DO ^XWBTCPMT.
>D ^XWBTCPMT

Interactive Broker Test
IP ADDRESS: 127.0.0.1
PORT: 9000

Success, response: accept
Our response was "Success". If you don't succeed, you may get "Fail". If that happens, refer to this page on troubleshooting the Broker in Vistapedia: http://www.vistapedia.com/index.php/VISTA_XWB_Broker_Troubleshooting.
To stop the broker, do ^XUP, and then choose XWB LISTENER STOP ALL:
>D ^XUP
Setting up programmer environment
This is a TEST account.

Terminal Type set to: C-VT100

Select OPTION NAME: XWB LISTENER STOP ALL       Stop All RPC Broker Listeners
Stop All RPC Broker Listeners
If you run lsof -iTCP -sTCP:LISTEN -P again, you won't see any output.
Independent of our set-up above, we can start the broker at any port we want from direct mode using J ZISTCP^XWBTCPM1(<port no>).
To test the broker from the client side, you can download the Broker SDK from the FOIA site: http://foia-vista.osehra.org/Patches_By_Application/XWB-RPC%20BROKER/XWB_1_1_P60_scrubbed.zip
Once you unzip it, you will find this file: ./Samples/BrokerEx/BrokerExample.exe. Run this, replace the server name and port with your ip address and port, and then click on connect.
Once you click connect, you will see the sign-in dialog: That means that the broker is functional.
Note: Because of the infamous XUSRB1.m problem, you won't be able to log-on right now. But you should be able to using CPRS.
This is a super user who will have elevated privileges. You can add other users such as Physicians, Pharmacists, etc. later. Set up the System Manager user with minimal information. We will add more information later. By convention, the super user has a DUZ of 1. So far we have been using the DUZ of .5. We have to use it one last time to make the system manager. Your access code is really your username. I set it up as SM1234, but you can put whatever you like. Go back into Fileman using S DUZ=.5 D Q^DI:
Select OPTION: 1   ENTER OR EDIT FILE ENTRIES

INPUT TO WHAT FILE: RPC BROKER PARAMETERS// 200   NEW PERSON
          (2 entries)
EDIT WHICH FIELD: ALL// .01   NAME
THEN EDIT FIELD: ACCESS CODE   Want to edit ACCESS CODE (Y/N)
THEN EDIT FIELD: <enter>

Select NEW PERSON NAME: `1  USER,ONE
NAME: USER,ONE// MANAGER,SYSTEM
Want to edit ACCESS CODE (Y/N): Y
Enter a new ACCESS CODE : ******
Please re-type the new code to show that I have it right: ******
OK, Access code has been changed!
The VERIFY CODE has been deleted as a security measure.
The user will have to enter a new one the next time they sign-on.

Select NEW PERSON NAME: <enter>
Next give your user privileges appropriate for a system manager. This brings us to VistA's security system.
VistA menu tree is built just like the Windows Registry: Folders (known as menus) which contain other folders or actual items which you can run. Each menu is like a door: it has a "key" which locks it; or it could be one of those sliding doors which doesn't have keys. A key to a door (ahem, menu) protects all the subsequent doors beyond the first door. If you lock the first door, you can keep the doors below it open. When we ran DO ^XUP, what we really did was that we went into the menu system.
Keys are also checked by runtime code in order to give privileges when performing certain operations. It's a very common practice in VistA for all users to have access to something, but only the holders of specific keys can perform certain actions. For example, all Lab users have "LRLAB"; but only those credentialed as Lab Technicians will have "LRVERIFY" to release the result.
Let's enlarge our analogy a bit: Users of the VistA system can be assigned a specific door to enter into: This is known as their PRIMARY MENU. A prevalent practice is to give everybody the PRIMARY MENU of XUCORE, which is analogous to a City Portal. Once you say who you are (ACCESS CODE) and your password (VERIFY CODE), you enter the City (XUCORE) and you can only enter the building for which you have the key.
What we do below is a couple of things: We give ourselves the Fileman Access Code (different from ACCESS CODE) of "@", which gives you the equivalent of root privileges in Fileman. Next, we give ourselves the keys XUMGR (let's you add users and manipulate tasks); XUPROG (let's you edit users [don't ask me why--I have no clue why they put that key there], and install Software); XUPROGMODE (let's you enter programmer mode); XMMGR (let's you manage mailman), XUSPF200 (let's you add users without requiring an SSN). By the way, privileged users can be given the ability to add new users and assign and take away keys using a mechanism called delegation. I won't cover that here.
>S DUZ=1
>S $P(^VA(200,DUZ,0),"^",4)="@"
>D ^XUP

Setting up programmer environment
Select TERMINAL TYPE NAME: C-VT320
Terminal Type set to: C-VT320

Select OPTION NAME: XUMAINT Menu Management

Select Menu Management Option: KEY Management

Select Key Management Option: ALLOcation of Security Keys

Allocate key: XUMGR

Another key: XUPROG
   1   XUPROG
   2   XUPROGMODE
CHOOSE 1-2: 1   XUPROG

Another key: XUPROGMODE

Another key: XMMGR

Another key: XUSPF200

Another key:

Holder of key: MANAGER,SYSTEM       SM

Another holder:

You've selected the following keys:
XUPROG     XUMGR     XUPROGMODE     XMMGR   XUSPF200

You've selected the following holders:

MANAGER,SYSTEM

You are allocating keys. Do you wish to proceed? YES//

XUPROG being assigned to:
   MANAGER,SYSTEM

XUMGR being assigned to:
   MANAGER,SYSTEM

XUPROGMODE being assigned to:
   MANAGER,SYSTEM

XMMGR being assigned to:
   MANAGER,SYSTEM

XUSPF200 being assigned to:
   MANAGER,SYSTEM

Select Key Management Option: <enter>
You are now ready to enter additional information for the system manager user like PRIMARY MENU, VERIFY CODE etc. You MUST enter a VERIFY CODE, otherwise, you won't be able to log in.
>D ^XUP

Setting up programmer environment
Terminal Type set to: C-VT320

Select OPTION NAME: XUSERED
    1   XUSEREDIT   Edit an Existing User
    2   XUSEREDITSELF   Edit User Characteristics
CHOOSE 1-2: 1 XUSEREDIT  Edit an Existing User
Edit an Existing User
Select NEW PERSON NAME: MANAGER,SYSTEM    SM
Before we go into details of the next screen, let's talk about the <PF1> key. Press <PF1> refers to notations for use of Vista on Terminals. For example, the original VT-320 keyboard had additional character sets and keys which include Find, Select, Insert, Remove, Previous Screen, Next Screen, an arrow cluster and F1 to F20. With Terminal Emulators, the Keys are "mapped", which means when you push a given key it acts as the key would in a terminal. For instance, F1, F2, F3 and F4 are equivalent to the PF1, PF2, PF3 and PF4 keys on the terminal keyboard and Page Up and Page Down on the computer keyboard correspond to Previous Screen and Next Screen. Also there is lots of information about terminals if you are interested at http://www.vt100.net. Also, the very beginning of this document tells you what are the recommended terminal emulators to use.
Now you will be presented with a screen with multiple options. You can navigate the screen with the TAB key. For navigation help, use your keyboard arrows to move down to the command line and hold down either the Num Lock key (which is mapped as PF1 of a VT-320 terminal by Caché) or F1 for other terminal emulations and hit "H" and then Enter for help. You can exit by typing "^" on the command line and the change you made will be saved. At a minimum, assign EVE as the PRIMARY MENU and enter IRM (it's the only choice) as SERVICE/SECTION. If you plan to use CPRS, enter OR CPRS GUI CHART as a SECONDARY MENU OPTION. Enter other data as you deem appropriate. If DISUSER or Termination Reason is set, use the '@' to delete both of them. To avoid problems down the road with a division that you didn't set-up, delete the DIVISION (tab to it, then enter, then @) that you see in the screen (unlike the screenshot below). No division means that the user will default to the main division, PALM DESERT HOSPITAL, which we already previously set-up.
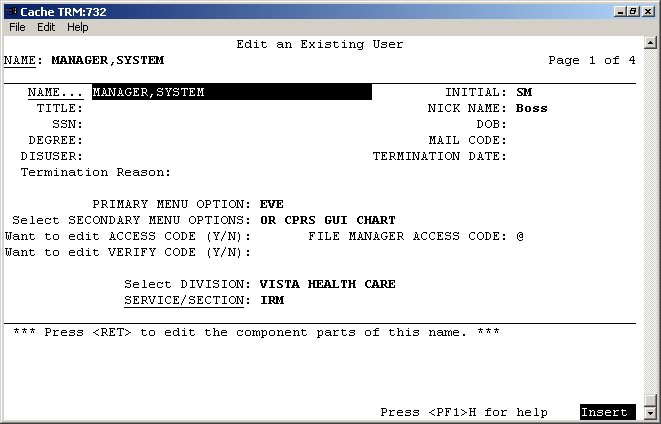
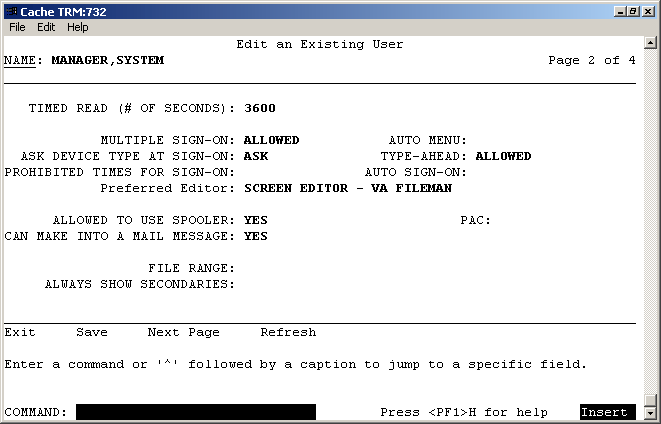
Type "N"EXT PAGE at COMMAND: to go to page 2 to update the TIMED READ field and other fields you wish to update. For DEFAULT TIMED-READ (SECONDS): if you change it to 3600 you will be allow an hour before being automatically signed off. It makes it easier to work when you are learning and setting things up. And for God's sake, please make sure that your Preferred Editor is SCREEN EDITOR - VA FILEMAN, otherwise you can only edit a line of text at a time.
At this point, you can go back to Direct Mode. We will now run ^ZU, which is the VistA front door, or in the above analogy, the City Portal. At the VISTA prompt, Type D ^ZU.
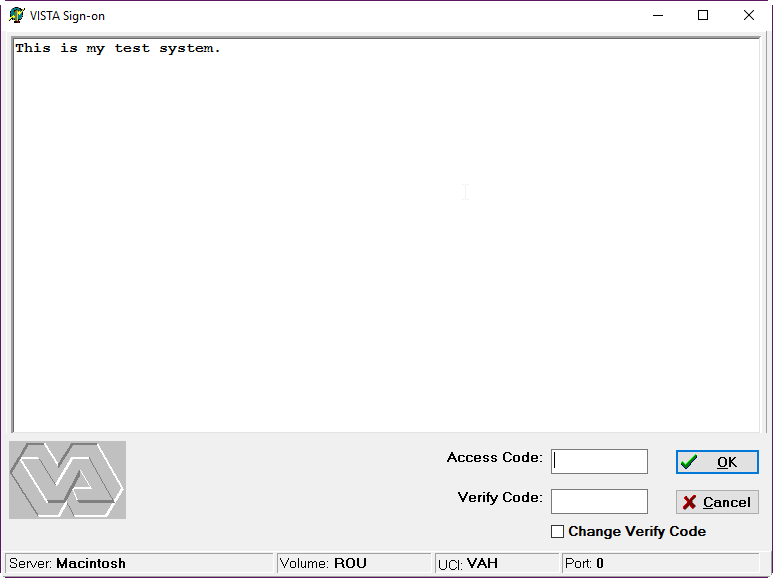
At ACCESS CODE, type in the code you chose when setting up MANAGER, SYSTEM as a NEW PERSON. At VERIFY CODE, enter the verify code you chose for yourself earlier, and then you will be asked to change it. The introduction message "This is my test system." is what we put in a while ago in the Kernel Set-Up section.
>D ^ZU
This is my test system.


Volume set: ROU:Macintosh  UCI: VAH  Device: /dev/ttys007

ACCESS CODE: ******
VERIFY CODE: *********
Device: /dev/ttys007

Good evening MANAGER,SYSTEM
     You last signed on today at 22:20
There were 2 unsuccessful attempts since you last signed on.


          Core Applications ...
          Device Management ...
          Menu Management ...
          Programmer Options ...
          Operations Management ...
          Spool Management ...
          Information Security Officer Menu ...
          Taskman Management ...
          User Management ...
          Application Utilities ...
          Capacity Planning ...
          HL7 Main Menu ...

Select Systems Manager Menu  Option:
At Select Systems Manager Menu Option: Type OPER, (short for operations management) and hit enter. You can see all of the choices available to you if you type ??.
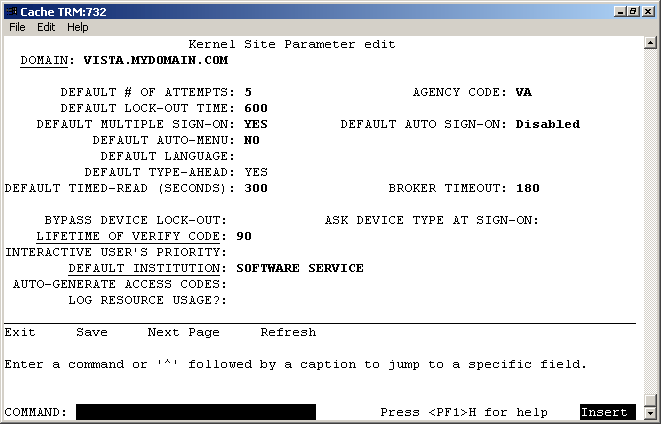
At Select Operations Management Option: Type KER short for Kernel Management Menu and hit enter. At Select Kernel Management Menu Option: Type ENT, short for Enter/Edit Kernel Site Parameters. Hit enter.
You will be presented with a similar screen as in editing the SYSTEM MANAGER characteristics. You can navigate the screen with the TAB key. For DEFAULT TIMED-READ (SECONDS): change it to 3600 to allow an hour before being automatically signed off, or whatever you choose.
I strongly recommend setting DEFAULT MULTIPLE SIGN-ON to YES.
Now you can exit this screen. Press <PF1>/<F1>-S and <PF1>/<F1>-E; and then press enter 4 times. You will be dumped back to your operating system. (Exit from the front door ^ZU dumps you all the way out from VistA. Type mumps -dir on GT.M or csession <INSTANCE> -U <NAMESPACE> to get back into direct mode for the next step.
Now send a message using Postmaster to your DUZ number. From Direct Mode, type S DUZ=.5 D ^XUP. You will get the response SETTING UP PROGRAMMER ENVIRONMENT then TERMINAL TYPE SET TO: (your default) and Select OPTION NAME:. You will need to respond: XMUSER. At Select Mailman Menu Option: type S (for send). At Subject: enter your subject, such as Test, and then hit enter. You will then be prompted You may enter the text of the message and you will be offered the line number 1> where you can type your message, such as the infamous Hello world. Next will be line 2> and if you are done, just hit enter and at EDIT Option: you can do the same. At Send mail to: POSTMASTER// enter the initials you used for your DUZ which were probably DBA for System Manager. You will then be told when Mailman was last used, which is probably NEVER. Hit enter at And Send to: and you should receive the message Select Message option: Transmit now// at which you hit enter and will hopefully receive the message Sending [1] Sent. Type ^ to exit.
Now see if you received it. Log on using D ^ZU. At the Systems Manager prompt, type MAILMAN MENU. If you don't see the NEW messages option, it means that you need to navigate to the submenu, and type "MAILMAN" again. Then at the Select Mailman Menu Option: type NEW Messages and Responses. Read the mail (figure out the steps on your own).
The next step is to create a user that can sign on to the CPRS GUI. The things to make sure that this new user has are
The menu option ensures that the user has the proper permissions to access CPRS after signing in with their ACCESS and VERIFY codes. The Tab access can limit the amount of things a user can access once they have signed in.
The adding of the user is done through the User Management menu in the menu system, which will ask for information in a series of prompts then will open a Screenman form to complete the task.
The following steps will add a generic CPRS,USER person who will be able to sign into CPRS.
From the previous mail message example, exiting out of mailman and pressing enter a couple of times will get you back to the System Manager Menu EVE. If you signed out, go back through the front door using mumps -r ZU (GTM/YDB) or csession <instance> -U <namespace> ZU.
        Core Applications ...
        Device Management ...
        Menu Management ...
        Programmer Options ...
        Operations Management ...
        Spool Management ...
        Information Security Officer Menu ...
        Taskman Management ...
        User Management ...
        Application Utilities ...
        Capacity Planning ...
        HL7 Main Menu ...


Select Systems Manager Menu  Option: User Management

        Add a New User to the System
        Grant Access by Profile
        Edit an Existing User
        Deactivate a User
        Reactivate a User
        List users
        User Inquiry
        Switch Identities
        File Access Security ...
           \**> Out of order:  ACCESS DISABLED
        Clear Electronic signature code
        Electronic Signature Block Edit
        List Inactive Person Class Users
        Manage User File ...
        OAA Trainee Registration Menu ...
        Person Class Edit
        Reprint Access agreement letter


Select User Management  Option: Add a New User to the System
Enter NEW PERSON's name (Family,Given Middle Suffix): CPRS,USER
  Are you adding 'CPRS,USER' as a new NEW PERSON (the 56TH)? No// Y  (Yes)
Checking SOUNDEX for matches.
No matches found.
Now for the Identifiers.
INITIAL: UC
SSN: <enter>
SEX: F  FEMALE
NPI: <enter>
Once in the Screenman form, you will need to set the necessary information mentioned above. Four pieces of information are able to be set on the first page of the Screenman form. The arrows are for emphasis to highlight where information needs to be entered and will not show up in the terminal window.
To add an access or verify codes, you need to first answer Y to the Want to edit ... questions, it will then prompt you to change the codes. Remember to give the user both an access and veify codes; otherwise, they won't be able to log-in.
Fill in as follows:
                            Edit an Existing User
NAME: CPRS,USER                                                     Page 1 of 5
_______________________________________________________________________________
   NAME... CPRS,USER                                   INITIAL: UC
    TITLE:                                           NICK NAME:
      SSN:                                                 DOB:
   DEGREE:                                           MAIL CODE:
  DISUSER:                                     TERMINATION DATE:
  Termination Reason:

           PRIMARY MENU OPTION:   <---
 Select SECONDARY MENU OPTIONS:   <---
Want to edit ACCESS CODE (Y/N):   <---  FILE MANAGER ACCESS CODE:
Want to edit VERIFY CODE (Y/N):   <---

              Select DIVISION:
         ---> SERVICE/SECTION:
_______________________________________________________________________________
 Exit     Save     Next Page     Refresh

Enter a command or '^' followed by a caption to jump to a specific field.


COMMAND:                                     Press H for help    Insert
To change to other pages, press the down arrow key or <TAB> until the cursor reaches the COMMAND box. Then type N or Next Page and press <enter> to display the next page.
There is nothing that needs to be set on the second page. On the third page, you MUST put in a provider person class (Physician, Nurse, etc; otherwise you won't be able to be a provider on encounters). Navigate to Person Class and then type "PHYSICIAN", press enter twice, and then choose #1. Press enter once, say yes, and then enter. At this point, you should see the entry; and the effective date should be today.
                            Edit an Existing User
NAME: CPRS,USER                                                     Page 3 of 5
_______________________________________________________________________________
PROHIBITED TIMES FOR SIGN-ON:

           PHONE:                        OFFICE PHONE:
COMMERCIAL PHONE:                          FAX NUMBER:
     VOICE PAGER:                       DIGITAL PAGER:
        LANGUAGE:

 Person Class                                         Effective     Expired

 Physician Assistants and Advanced Practi          DEC 4,2016


_______________________________________________________________________________

Exit    Save    Next Page    Previous Page    Refresh    Quit

Enter a COMMAND, or "^" followed by the CAPTION of a FIELD to jump to.
COMMAND: e                                       Press H for help  Insert
On the fourth page, CPRS Tab Access is set. Navigate first to "RESTRICT PATIENT SELECTION", set that to "NO", and then navigate the cursor to the location under the Name header and enter COR, which stands for Core Tab Access, and enter an effective date of yesterday, T-1 is the notation to use.
Edit an Existing User NAME: CPRS,USER Page 4 of 5 _______________________________________________________________________________ RESTRICT PATIENT SELECTION:-> OE/RR LIST: CPRS TAB ACCESS: Name Description Effective Date Expiration Date -> _______________________________________________________________________________ COMMAND: PressH for help
Once that is done, save and exit the Screenman form via the COMMAND box and then answer the final questions regarding access letters, security keys and mail groups. For security keys, there are two we need to add: ORES and PROVIDER.
Exit Save Next Page Refresh Enter a command or '^' followed by a caption to jump to a specific field. COMMAND: E PressH for help Insert Print User Account Access Letter? NO Do you wish to allocate security keys? NO// YES Allocate key: PROVIDER 1 PROVIDER 2 PROVIDER ID EDIT IB PROVIDER EDIT CHOOSE 1-2: 1 PROVIDER Another key: ORES Another key: <enter> Another holder: <enter> You've selected the following keys: PROVIDER ORES You've selected the following holders: CPRS,USER You are allocating keys. Do you wish to proceed? YES// <enter> PROVIDER being assigned to: CPRS,USER ORES being assigned to: CPRS,USER Do you wish to add this user to mail groups? NO// NO ... Select User Management Option: ^<enter> >
At this point, CPRS can successfully connect to the local VistA instance and the CPRS,USER will be able to sign on and interact with the GUI.
The next part is laborious and tedious: finding the correct vesion of CPRS to run on your FOIA instance.
NB: If you have been following on a Linux or Mac machine so far, you need to switch to Windows or use Wine 1.8 or higher to run CPRS. Earlier versions of Wine had an unimplemented function in comctl32.dll that prevented CPRS from running.
The first thing is that you need to go into Fileman, and find out what the version of CPRS you need to use is:
>S DUZ=1 D Q^DI


VA Fileman 22.2


Select OPTION: INQUIRE TO FILE ENTRIES


Output from what File: 19  OPTION         (10351 entries)
Select OPTION NAME: OR CPRS GUI CHART       CPRSChart version 1.0.30.75
Another one: ^
Okay. So we need 1.0.30.75. So we navigate here: http://foia-vista.osehra.org/Patches_By_Application/CPRS%20GUI%20FILES/, and from there, try to guess which version we need. From my version string, it looks like we need version 30. There are three version 30's; so I guess I should choose the latest one.
At this point, we need to look for a .zip file. Looking through the list, I see
The one most likely to contain the CPRS exe is OR_30_423_scrubbed.zip; SRC_scrubbed.zip is the CPRS source code, which also may contain a compiled version.
Please please note that this is what I see when I write this at the end of 2016; what you see in the future will certainly be different.
So I download OR_30_423_scrubbed.zip, and open it. There is a CPRSChart.exe in that one. But what version?
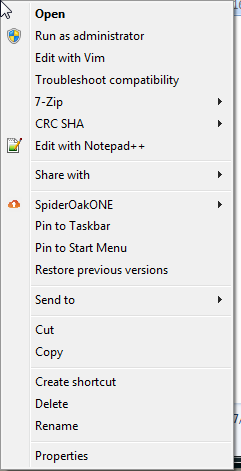
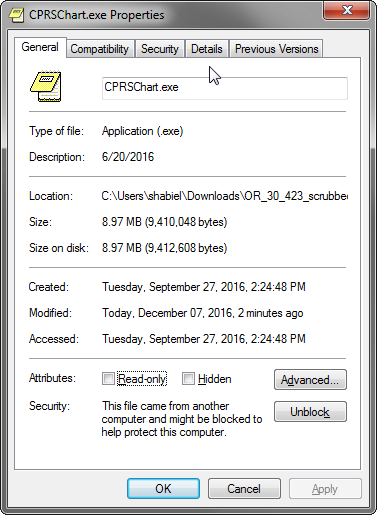
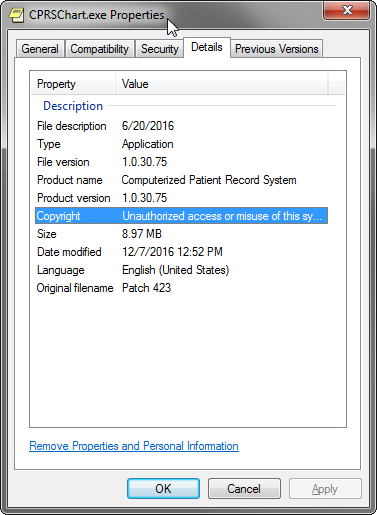
We can find that out by right clicking on the exe, choosing properties, and then choosing the 4th tab. Over there, you will see the version number. Make sure that that's the right version number compared with what you have.
If you have the right version, we can try running it, but you will get an error right away saying that 'borlndmm.dll' is needed.
You can find 'borlndmm.dll' in the source code download referenced above (the zip file that contains SRC in the name) in the CPRS-Chart folder. While I am updating these instructions, I found that the 'borlndmm.dll' was actually with CPRSChart.exe. Copy that file to the folder where the CPRSChart.exe is located at.
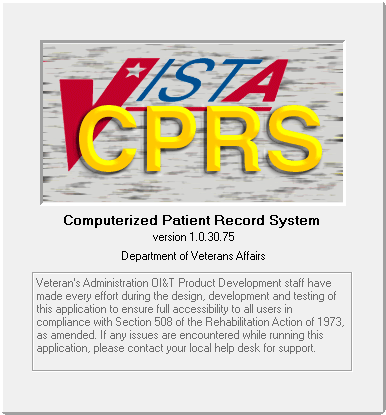
Now, try to run CPRS again. You will get this splash screen:
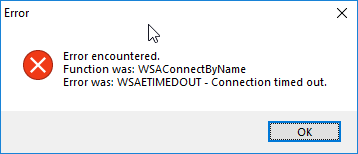
But then, you may see this:
What you have to do is to invoke CPRS with 3 parameters in order to tell it where and how to connect.
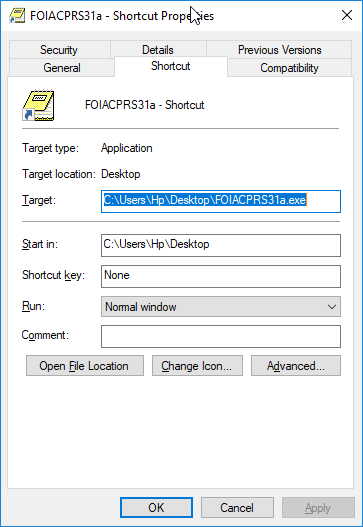
The way to do that on Microsoft Windows for end users is to create a shortcut and modify the target. Therefore, here's what you need to do: right click on CPRS, and choose "Create Shortcut". You will see a shortcut icon right in the same window. Something that looks like this:
Right-click on that, and then click (i.e. left click) on properties. You will see the following:
In the target field, append the s, p, and ccow as described above. Here is mine:
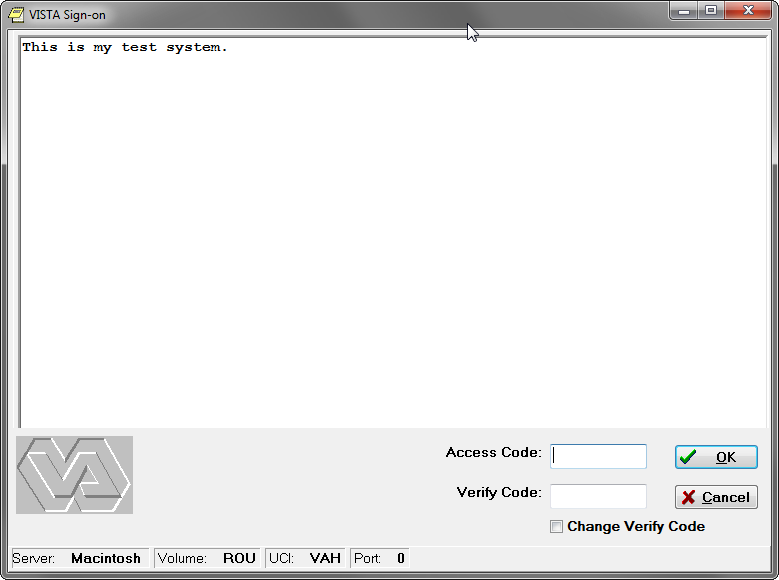
C:\Users\Hp\Desktop\FOIACPRS31a.exe s=192.168.1.181 p=9000 ccow=disableClick OK. You will see that CPRS connects, and display the access and verify screen:
Now, put in the access and verify codes. If you followed along, this would be CPRS1234 and USR.1234.
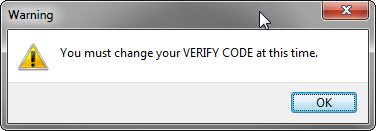
Once you sign-in, since you are signing in for the first time, you will be asked to change your verify code:
Go ahead and change it (no screen shot shown) and then click OK. It will confirm that it changed, and then you will see the patient selection screen.
You should be happy when you reach this point; except that a medical records system is useless without patients.
Let's register a patient. Login using the CPRS User we just set-up.
NB: On GT.M/YottaDB, patient registration will crash, as it tries to use Cache Specific Code. To fix that, we need to edit some routines. To edit a routine in GT.M/YDB, it's easiest to just edit it on the shell. You will recall that we installed VistA in /var/db/<name>. And we copied all routines into the r directory. edit the code, use an editor (a simple editor to use is nano) and edit the file. For example, to edit MPIFXMLP, enter
nano /var/db/<name>/r/MPIFXMLP.m.If you want to register the patient on GT.M/YottaDB, edit routine MPIFXMLP, changing the label PATIENT to ZPATIENT
In routine DGRPD, in line 34 remove the errant space:
N DGSKIP S DGSKIP=$S(DGFORGN:"!,?42,""From/To: """,1:"?42, ""From/To: """)to
N DGSKIP S DGSKIP=$S(DGFORGN:"!,?42,""From/To: """,1:"?42,""From/To: """)
Now we can register the patient.
$ mumps -r ^ZU
This is my test system.
Volume set: ROU:Macintosh UCI: VAH Device: /dev/ttys001
ACCESS CODE: ***************** (Access Code;Verify Code)
Good afternoon CPRS,USER
You last signed on today at 16:36
DENT Dental ...
EN Engineering Main Menu ...
FEE Fee Basis Main Menu ...
FH Dietetic Administration ...
GECO Miscellaneous Code Sheet Manager Menu ...
GECS Generic Code Sheet Menu ...
GMRA Adverse Reaction Tracking ...
IB Integrated Billing Master Menu ...
MCAR Medicine Menu ...
NU Nursing System Manager's Menu ...
PDX Patient Data Exchange ...
PROS Prosthetic Official's Menu ...
PRPF Patient Funds (INTEGRATED) System ...
RA Rad/Nuc Med Total System Menu ...
ROES Remote Order/Entry System ASPS Menu ...
RT Record Tracking Total System Menu ...
SR Surgery Menu ...
SW Information Management Systems (SWIMS) ...
TIU TIU Maintenance Menu ...
VMAS Volunteer Timekeeping Activity ...
VOL Volunteer Master Menu ...
YSM MHS Manager ...
Press 'RETURN' to continue, '^' to stop: <enter>
YSU Mental Health ...
ADT Manager Menu ...
CPRS Manager Menu ...
CPRS Menu
Employee Menu ...
Finance AR Manager Menu ...
Health Summary Coordinator's Menu ...
Health Summary Enhanced Menu ...
Health Summary Menu ...
IV Menu ...
Library Management ...
National Drug File Menu ...
Outpatient Pharmacy Manager ...
Payroll Main Menu ...
Payroll Supervisor Menu ...
Scheduling Manager's Menu ...
Serials Control ...
Unit Dose Medications ...
Select Core Applications Option: ADT Manager Menu
CPT codes and descriptions are copyright 2016 by the American Medical
Association (AMA). All Rights Reserved. CPT is a registered trademark of the
American Medical Association.
Press any key to continue<enter>
ADT Outputs Menu ...
Bed Control Menu ...
Beneficiary Travel Menu ...
Contract Nursing Home RUG Menu ...
Eligibility Inquiry for Patient Billing
MAS Code Sheet Manager Menu ...
Patient Inquiry
PTF Menu ...
Registration Menu ...
RUG-II Menu ...
Select ADT Manager Menu Option: Registration Menu
DA Disposition an Application
EN Patient Enrollment
PHH Purple Heart Request History
PHS Purple Heart Status Report
Add/Edit/Delete Catastrophic Disability
Collateral Patient Register
Combat Vet Status Report
Delete a Registration
Disposition Log Edit
Edit Inconsistent Data for a Patient
Eligibility Inquiry for Patient Billing
Eligibility Verification
Load/Edit Patient Data
Means Test User Menu ...
Patient Inquiry
Preregistration Menu ...
Print Patient Wristband
Pseudo SSN Report (Patient)
Register a Patient
Report - All Address Change with Rx
Report - All Address Changes
Report - All Patients flagged with a Bad Address
Press 'RETURN' to continue, '^' to stop:<enter>
Unsupported CV End Dates Report
View Patient Address
View Registration Data
Select Registration Menu Option: Register a Patient
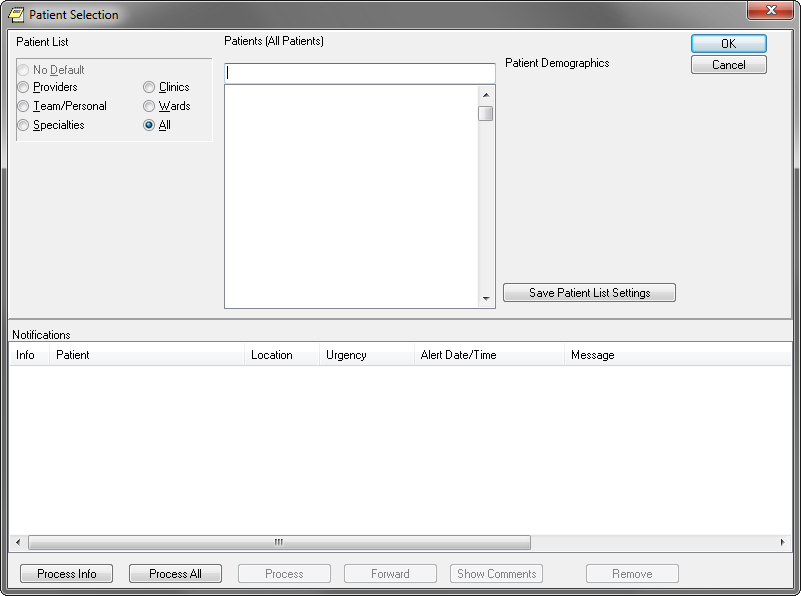
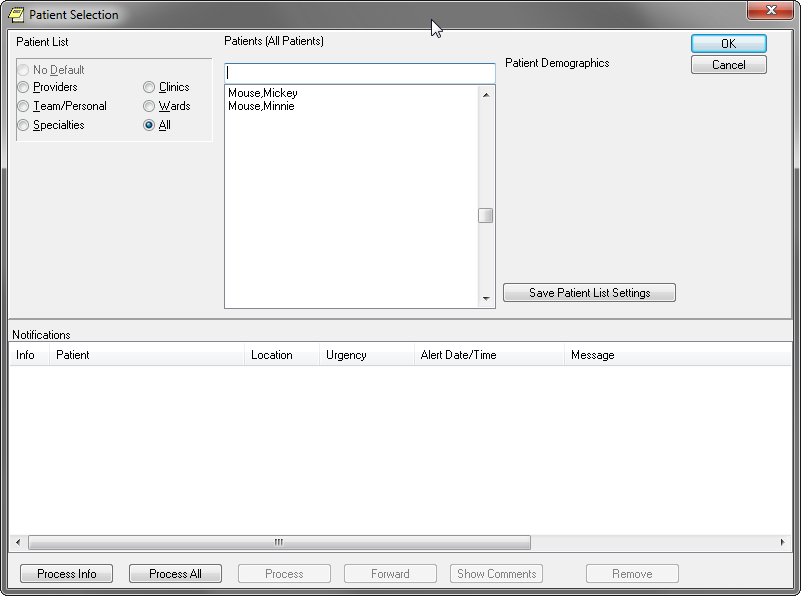
Select PATIENT NAME: MOUSE,MINNIE
ARE YOU ADDING 'MOUSE,MINNIE' AS A NEW PATIENT (THE 2ND)? No// Y (Yes)
PATIENT SEX: F FEMALE
PATIENT DATE OF BIRTH: 11/11/47 (NOV 11, 1947)
PATIENT SOCIAL SECURITY NUMBER: P 505111148P
PATIENT PSEUDO SSN REASON: N NO SSN ASSIGNED
PATIENT TYPE: N
1 NEWBORN OF VETERAN
2 NON-VETERAN (OTHER)
3 NSC VETERAN
CHOOSE 1-3: 2 NON-VETERAN (OTHER)
PATIENT VETERAN (Y/N)?: N NO
PATIENT SERVICE CONNECTED?: N NO
PATIENT MULTIPLE BIRTH INDICATOR:<enter>
...searching for potential duplicates..
The following patients have been identified as potential duplicates:
MOUSE,MICKEY 11-11-47 505111147P **Pseudo SSN** NO NON-VETE
RAN (OTHER)
Do you still want to add 'MOUSE,MINNIE' as a new patient? No// Y (Yes)
...adding new patient...new patient added
Patient name components--
FAMILY (LAST) NAME: MOUSE//<enter>
GIVEN (FIRST) NAME: MINNIE//<enter>
MIDDLE NAME:<enter>
PREFIX:<enter>
SUFFIX:<enter>
DEGREE:<enter>
Press ENTER to continue<enter>
Please verify or update the following information:<enter>
MOTHER'S MAIDEN NAME:<enter>
PLACE OF BIRTH [CITY]:<enter>
PLACE OF BIRTH [STATE]:<enter>
Select ALIAS:<enter>
Attempting to connect to the Master Patient Index in Austin...
If no SSN or inexact DOB or common name, this request
may take some time, please be patient...
Could not connect to MPI or Timed Out, assigning local ICN (if not already assig
ned)...<enter>
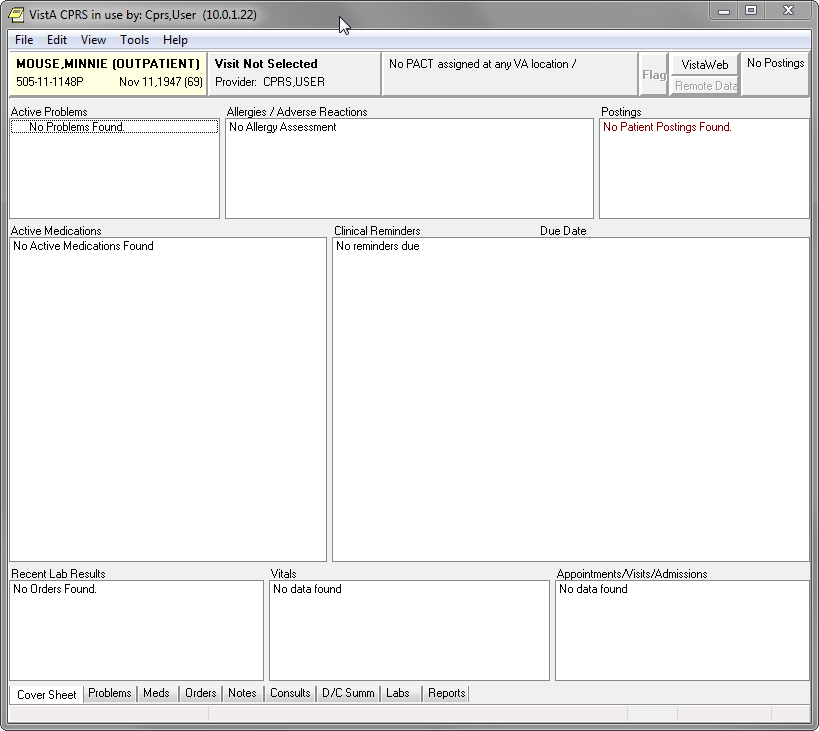
MOUSE,MINNIE 505-11-1148P NOV 11,1947
=============================================================================
Address: STREET ADDRESS UNKNOWN Temporary: NO TEMPORARY ADDRESS
UNK. CITY/STATE
County: UNSPECIFIED From/To: NOT APPLICABLE
Phone: UNSPECIFIED Phone: NOT APPLICABLE
Office: UNSPECIFIED
Cell: UNSPECIFIED
E-mail: UNSPECIFIED
Bad Addr:
Confidential Address: Confidential Address Categories:
NO CONFIDENTIAL ADDRESS
From/To: NOT APPLICABLE
POS: UNSPECIFIED Claim #: UNSPECIFIED
Relig: UNSPECIFIED Sex: FEMALE
Race: UNANSWERED Ethnicity: UNANSWERED
Type <Enter> to continue or '^' to exit: ^
Now, if you run CPRS again, you will see a patient, and you can select them:
and then you will see the cover sheet:
There is little you can do because most of VistA is not set-up. But you can now get an idea of what CPRS is like. The most important step is to at least create one clinic. You can do that in the SDBUILD menu. Doing this will unlock most of CPRS for you.
You can learn more about using CPRS from here: https://www.vehu.va.gov/cprs_training.cfm.
To stop Taskman, use D STOP^ZTMKU and answer YES to stopping the submanagers.
To stop Broker, use D STOP^XWBTCP(<port no>).
To stop mailman, use D STOP^XMKPL and answer YES to stop it.