| Contents: | Main | Chapter | See Also: | Advanced User Manual | Programmer Manual | |||
Many reports that you print from applications are pre-designed; that is, the selection of records, and the fields that print for each record are pre-determined by the designer of the application. You simply choose the report you would like to print from a menu option, choose an output device, and the selected report prints.
You can also create your own reports, however, if you have either VA FileMan's print options, or custom-designed application options that take advantage of the same VA FileMan features. This chapter introduces one of VA FileMan's print options, Inquire to File Entries.
There are two ways you'll have an opportunity to use VA FileMan's inquiry capabilities:
In either case, use of VA FileMan's inquire feature is very similar. In most cases, the only difference is that with the Inquire to File Entries option, you have to choose which file to inquire to.
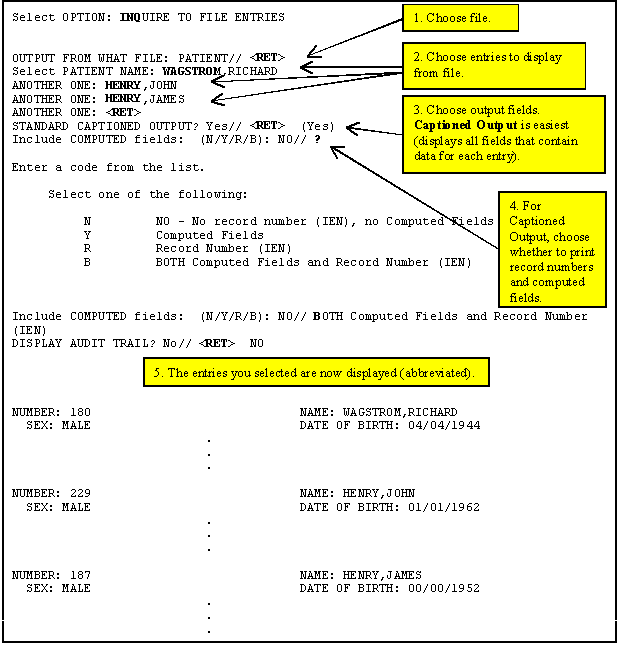
The quickest way to display the data for one file entry or for a small number of entries is to use the Inquire to File Entries option. This option lets you choose a set of entries to display, and choose the fields that you want to see for each entry.
For example:

Choosing CAPTIONED output can be very useful; it prints out all fields (that contain data) for each entry in your report. Use it is a quick way to select all the fields for each entry in your report. Otherwise you need to select each field to print individually, from the list of fields available to print in the file. Answering YES to use CAPTIONED output is the fastest way to choose what fields to print.
The "Include COMPUTED Fields:" Prompt
When using CAPTIONED output, you can choose whether to include COMPUTED fields, record numbers, both, or neither. The default is to display neither. Enter two question marks for detailed Help about responding to this prompt.
The "DISPLAY AUDIT TRAIL?" Prompt
If one or more of the fields have been audited, you will see this additional question. If you answer YES, then you will see the changes that have been recorded for the various fields in the AUDIT file (#1.1), along with the current values of the fields.
When you choose several entries to display, you will be prompted with the following:
STORE THESE ENTRY ID's IN A TEMPLATE:
You can save your list of selected entries in a SORT template by entering a template name at this prompt. Your list of entries is then saved in a SORT template. You can then reuse the list of selected entries in the template when you do additional printing from this file in the future.
NOTE: For more information on using SORT templates, please refer to the "Saving Sort Criteria (SORT Templates)" topic in the "Print" chapter in this manual.
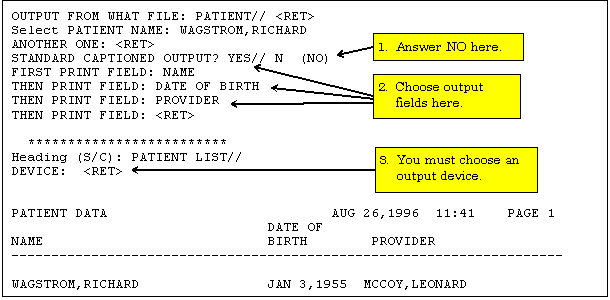
To choose your own fields to output for each entry, answer NO to the "STANDARD CAPTIONED OUTPUT?" prompt. You can then choose your own output fields. For example, if you only need NAME, DATE OF BIRTH, and PROVIDER information about a selected patient, you could request it, as shown in the following example:

NOTE: For more information on customizing output print fields, please refer to the "Print" chapter in this manual. It provides detailed information about the different choices you can make at the "PRINT FIELD:" prompt to display your information in different ways.
22.2When inquiring to certain Files, you may get a prompt that look like this:
FIRST PRINT FIELD: [TEMPLATE NAME]
In this case, some developer has designated the Template whose name is shown as the 'canonic' template
for this File. This will be the "most likely" kind of print output
for the File. Either hit <return> to accept this default, or
answer as above.
If you enter YES at the "STANDARD CAPTIONED OUTPUT?" prompt, output is sent to the HOME device, which ordinarily is the terminal you are using. To send output to a printer, you need to answer NO at the "STANDARD CAPTIONED OUTPUT?" prompt. This means you must choose your own print fields, as described above. Doing this allows you to select the output device, however.
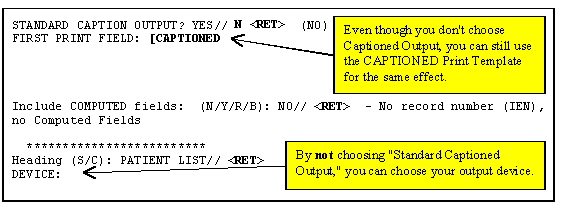
If you answer NO to the "STANDARD CAPTIONED OUTPUT?" prompt, you can still get CAPTIONED output, however. To do this, choose the CAPTIONED PRINT template at the first "PRINT FIELD:" prompt, as shown below.
Enter a left bracket, "[", and the word CAPTIONED. CAPTIONED OUTPUT from the template works exactly as if you had answered YES at the "STANDARD CAPTIONED OUTPUT?" to request CAPTIONED OUTPUT.

Reviewed/Updated: October 2016