| Contents: | Main | Chapter | See Also: | Getting Started Manual | Programmer Manual | |||
VA FileMan ...                      [DIUSER]
      Other Options ...                [DIOTHER]
          Import Data              [DDMP IMPORT]
The Import Tool lets you import records stored in an ASCII data file into a VA FileMan file.
The Import Tool imports records from an ASCII data file by adding them as new records to the VA FileMan file in question. Existing records in the destination VA FileMan file are never edited or updated, and the Import Tool does not prevent duplicate records from being added.
Importing data records from an ASCII file is a four-step process, as described below.
Generate your source file (from your non-VA FileMan application), containing the records to be imported. Generate the file with one record per line, with the fields in each record being set off using either the Delimited or Fixed-length method. The last record in the file must be terminated with the appropriate EOL (end-of-line) character(s) for your operating system.
Once you generate your ASCII source file, you need to move it to a disk that is accessible from the computer system running VA FileMan. Your IRM should be able to assist you with this.
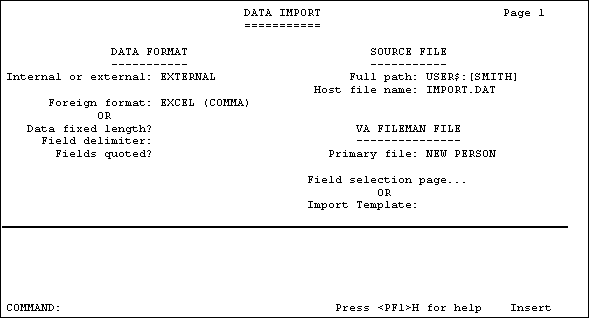
Invoke VA FileMan's Import Data option. It loads a two-page ScreenMan form. On page one of the form, you need to specify the data format, source file, and destination file for your import.
DATA FORMAT -- INTERNAL or EXTERNAL: Specify if the incoming data is in external form (the way VA FileMan would display it) or internal form (the way VA FileMan would store it). Unless you are knowledgeable about how VA FileMan stores data, you should choose EXTERNAL. Also, the incoming data is only validated by VA FileMan if you choose EXTERNAL (validation prevents you from putting invalid data into the file).
FOREIGN FORMAT: Choose a Foreign Format entry whose settings match the ASCII format for the incoming records. The only settings used from the Foreign Format entry are Record Delimiter, Record Length Fixed?, and Quote Non-numeric Fields?. Make sure the settings in the Foreign Format match the format of your incoming data. Because some foreign applications export data in a different format than they import it, a Foreign Format that works for export may not have the appropriate settings for import.
As an alternative to specifying a Foreign Format entry, you can manually specify the settings for your incoming data in the three provided fields:
SOURCE FILE: Enter the path and name of your source file (the file containing the records to import).
VA FILEMAN FILE: Specify the destination file for the imported records.
FIELD SELECTION PAGE/IMPORT TEMPLATE: This is where you match the fields in the incoming records to the fields in the destination file. If you don't have an existing IMPORT template that matches incoming to destination fields, go to the Field Selection page and specify those fields individually (see the "Match Source to Destination Fields" topic below).
A completed page one of the form might look like:

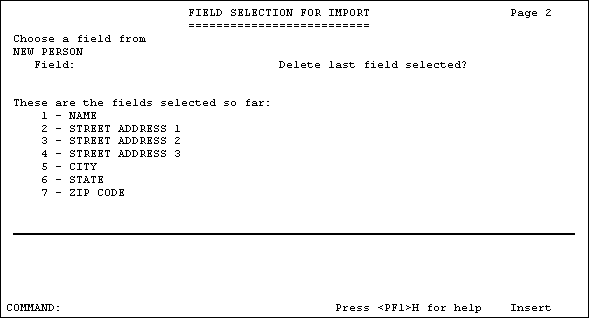
For your import, you need to match each field in the incoming record to a field in the destination VA FileMan file.
Fields in the incoming record are imported in order, from left to right. Thus, for each field in the incoming record, you specify the corresponding destination field in the VA FileMan file, in the same order. The first VA FileMan field you specify will be the destination for the first field in the incoming record, the second will match the second field in the incoming record, and so forth.

Remember that you must include the .01 field, and any fields that are required identifiers for the top level of the file. The same is true for any Subfiles (Multiples).
If you specified a fixed-length (as opposed to delimited) data format for the incoming records, you must enter not only the destination VA FileMan field, but also the length for each corresponding incoming field.
Each time you enter a field at the "Field:" prompt, it's added to the bottom of the list of fields displayed on the form. This shows you the destination fields you've selected, and their order. If you make a mistake, you can delete fields from the bottom of the list, one-by-one, by entering YES at the "Delete last field selected?" prompt. To insert a field, delete back to the insertion point, enter the new field, and then re-enter the deleted fields.
NOTE: There are special issues when importing data into fields in Multiples (see the "Special Considerations: Multiples" section).
You can save the information you specify on the Field Selection page in an IMPORT template. This lets you reuse the field matching criteria you have entered for subsequent imports that use the same file and fields, without having to re-enter it. To save your field specifications as an IMPORT template, answer YES to the "Do you want to store the selected fields in an Import Template?" question, which you're asked after you exit the Import form (see "Run the Import" below). Then, for future imports, simply enter the name of the IMPORT template on Page 1 of the Import form. You can use any IMPORT template to which your VA FileMan Access Code gives you access.
Once you've set up your data format, source file, and destination file, and matched source to destination fields, exit the Import form (press <PF1>E). After you exit the form, you're asked a series of questions:
Storing your file and field specifications in an IMPORT template lets you do subsequent imports without having to re-enter all of the field information.
If you proceed with the import, enter a device to which the Import Results report should print. You can run the Import directly or queue it.
As the import proceeds, if an error occurs updating a field in a particular record, the record won't be added, and an error message is added to the Import Report saying what the problem was.
An example of the dialogue after exiting the Import form is shown below:
Do you want to store the selected fields in an Import Template? YES

    Name of Import Template: ZZIMPORT
      Are you adding 'ZZIMPORT' as a new Import Template? YES

    Do you want to proceed with the import? YES

    Device for Import Results Report: HOME//   SYSTEM
Once the import finishes, you can review the Import Results report. It lists:
Here's a sample Import Results report:
Log for VA FileMan Data Import              Page 1
                         ==============================

                     Import Initiated By: JOHN SMITH

                             Source File: USER$:[SMITHJ]IMPORT.DAT
                            Fixed Length: NO
                            Delimited By: ,
                      Text Values Quoted: NO
                              Values Are: External

        Primary FileMan Destination File: NEW PERSON

Seq  Len  Field Name                      Subfile Name (if applicable)
---  ---  ----------                      ----------------------------
1    n/a  NAME
2    n/a  STREET ADDRESS 1
3    n/a  STREET ADDRESS 2
4    n/a  STREET ADDRESS 3
5    n/a  CITY
6    n/a  STATE
7    n/a  ZIP CODE


                                  Error Report
                                  ------------

Record #4 Rejected:
   The value 'Illlinois' for field STATE in file NEW PERSON is not valid.


                               Summary of Import
                               -----------------

                     Total Records Read: 7
                    Total Records Filed: 6
                 Total Records Rejected: 1

              IEN of First Record Filed: 209
               IEN of Last Record Filed: 214

                  Import Filing Started: Jul 16, 1996@08:24:36
                Import Filing Completed: Jul 16, 1996@08:24:38
                  Time of Import Filing: 0:00:02
In this example, six records were added, and one record was not added. The record that was not added was the fourth record in the source file. It failed due to the misspelled value "Illlinois" being rejected by the STATE field in the NEW PERSON file (#200).
Reviewed/Updated: March 4, 2007